Goodbye telemetry and ads - running Pi-Hole in a home network

On most devices that I frequently use, I use a solution to block excessive ads. Firefox on mobile and desktop is super easy as the same ad blocking extensions work on both. Many of my friends have been praising Pi-Hole for quite some time, as it’s a DNS-based solution that blocks telemetry, ads, malware, and other suspicious traffic by simply rerouting specific domains to nowhere.
It’s an approach where you filter your traffic without relying on a client-based device. As long as your devices point to an internal DNS endpoint that is actually a Pi-Hole instance, you’re good.
I wanted to give Pi-Hole a proper try, so here’s how that turned out.
Where to run Pi-Hole?
You can host Pi-Hole on a virtual machine or run it in a Docker container. I’m actively trying to eliminate the numerous virtual machines I have, so I opted to run it in a Docker container. For Docker, it’s easy to either use the free Docker Desktop or, as in my case – run Docker in a supported NAS.
My NAS is a Synology DS1821+, with 32 GB of RAM. I’m not utilizing it that much yet, so adding another Docker container isn’t an issue. The main thing is to have it running at all times – as dozens of devices in my network would then rely on this service.
Installing Pi-Hole in Docker
Installing Pi-Hole is easy. The guide on GitHub is easy to follow, as you need the Docker Compose file and a working Docker installation.
As I’m using the NAS to run my Docker containers, I can follow the same guide or use the fancy GUI. I used the GUI to ensure it works through that also. I have a folder in my storage where I can store all Docker data. This way, it’s easy to backup any relevant configuration and data, even if the container somehow fails in the future.
The settings I set were minimal:
- Mounted
/etc/piholeto a local folder on my NAS - Mounted
/etc/dnsmasq.dto a local folder on my NAS - Added the
WEB_PORTvariable to point to 8123/TCP - Added the
WEBPASSWORDvariable to define my Pi-Hole admin password
And that’s it, really. I used the ready-packaged Docker container from Docker Hub, which you can find here.
I’m also using another Docker solution, called Watchtower, to check if updates to the Docker container image are published. It will then shut down the Pi-Hole container, refresh it, and restart it. You can download it from here.
Configuring Pi-Hole
Now that Pi-Hole is installed, it’s time to configure it. First, I logged into my Docker host to verify the image is running with docker container stats <imageid>:

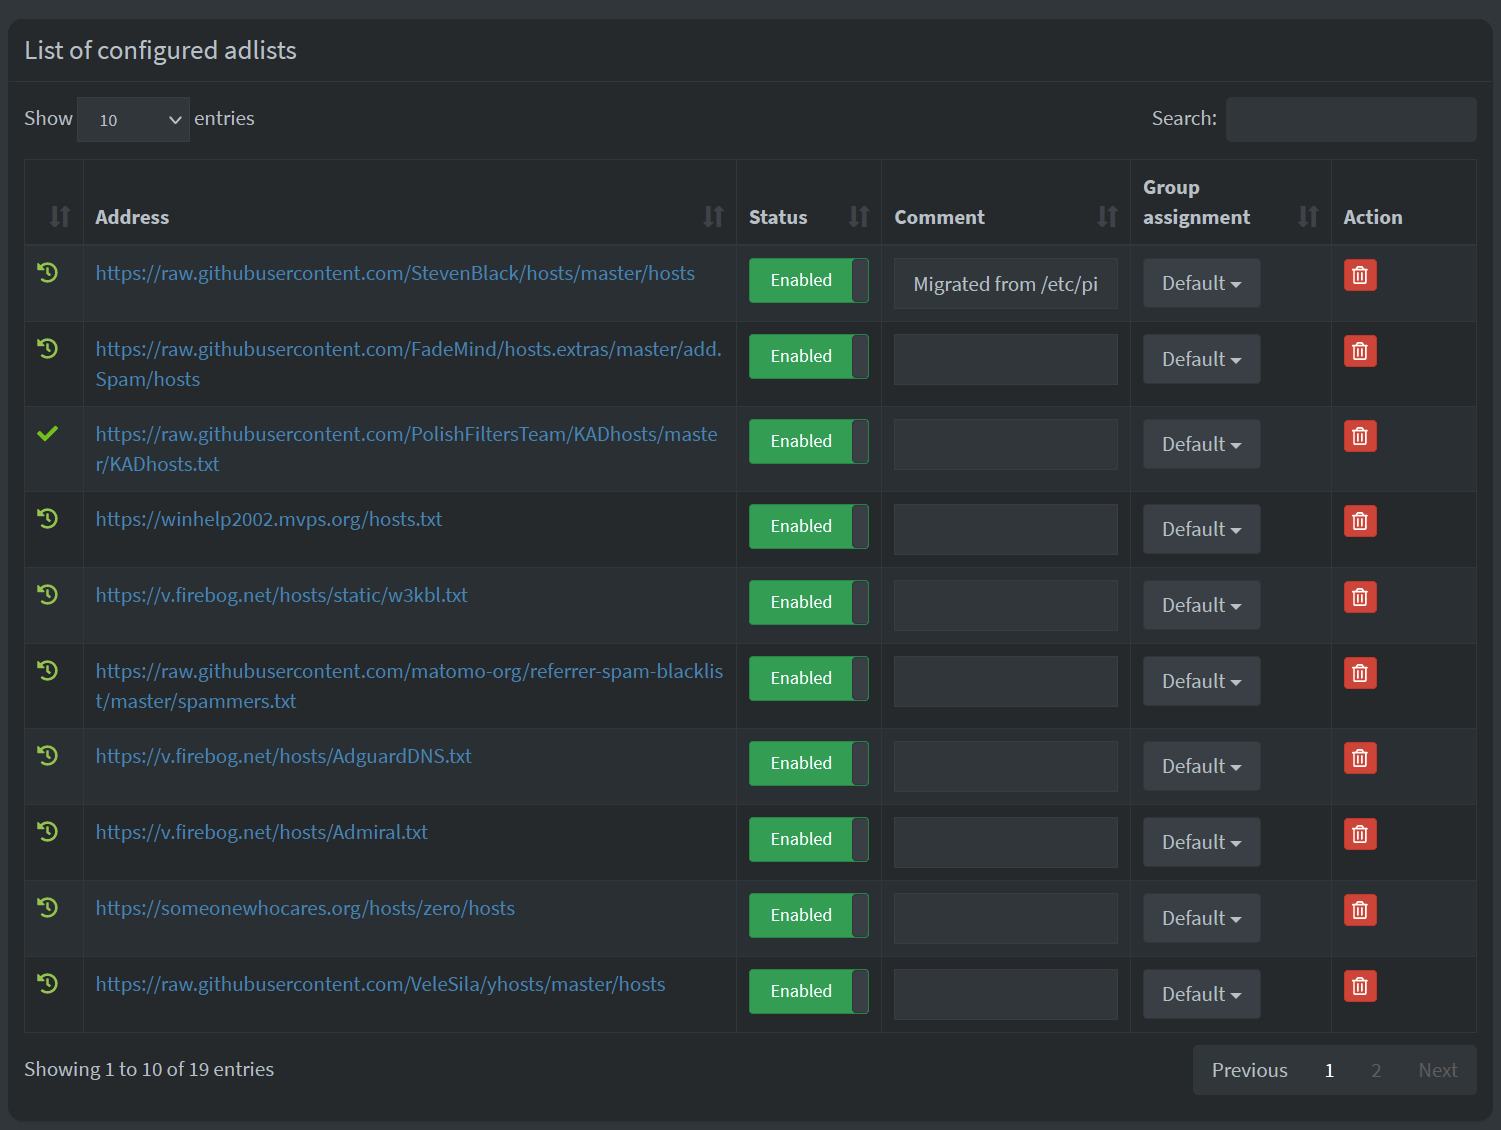
Once you log in, you get to configure the service. All that needs to be done is to add the blocking lists (adlists) under Group Management > Adlists. I’ve added about 20 different lists:
These adlists are like your regular HOSTS.TXT file in Windows – they list all the possible DNS entries you want to route to a blackhole. Here’s a snippet:
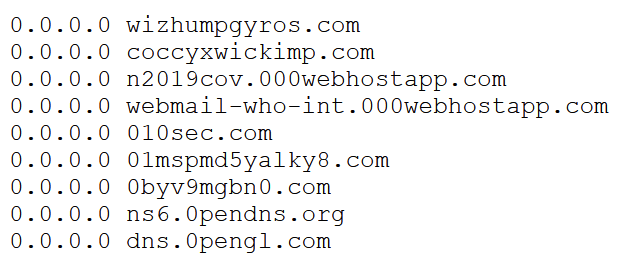
Why point to 0.0.0.0? Well, because it’s the official non-routable meta-address commonly used to invalidate a query. See details here.
By having these massive lists, you can quite effectively block a plethora of useless telemetry and ads traffic very efficiently. I’m using the following adlists currently:
- https://raw.githubusercontent.com/StevenBlack/hosts/master/hosts
- https://raw.githubusercontent.com/FadeMind/hosts.extras/master/add.Spam/hosts
- https://raw.githubusercontent.com/PolishFiltersTeam/KADhosts/master/KADhosts.txt
- https://winhelp2002.mvps.org/hosts.txt
- https://v.firebog.net/hosts/static/w3kbl.txt
- https://raw.githubusercontent.com/matomo-org/referrer-spam-blacklist/master/spammers.txt
- https://v.firebog.net/hosts/AdguardDNS.txt
- https://v.firebog.net/hosts/Admiral.txt
- https://someonewhocares.org/hosts/zero/hosts
- https://raw.githubusercontent.com/VeleSila/yhosts/master/hosts
- https://raw.githubusercontent.com/RooneyMcNibNug/pihole-stuff/master/SNAFU.txt
- https://paulgb.github.io/BarbBlock/blacklists/hosts-file.txt
- https://adaway.org/hosts.txt
- https://raw.githubusercontent.com/anudeepND/blacklist/master/adservers.txt
- https://s3.amazonaws.com/lists.disconnect.me/simple_ad.txt
- https://v.firebog.net/hosts/Easylist.txt
- https://pgl.yoyo.org/adservers/serverlist.php?hostformat=hosts&showintro=0&mimetype=plaintext
- https://raw.githubusercontent.com/FadeMind/hosts.extras/master/UncheckyAds/hosts
- https://raw.githubusercontent.com/bigdargon/hostsVN/master/hosts
These all add up to more than 200,000 unique domains. New ones inevitably pop up each day, and old ones go away. But it doesn’t matter, as you can keep adding new adlists when needed.
Under Pi-Hole´s admin interface, in Tools > Update Gravity you can refresh the configured lists:
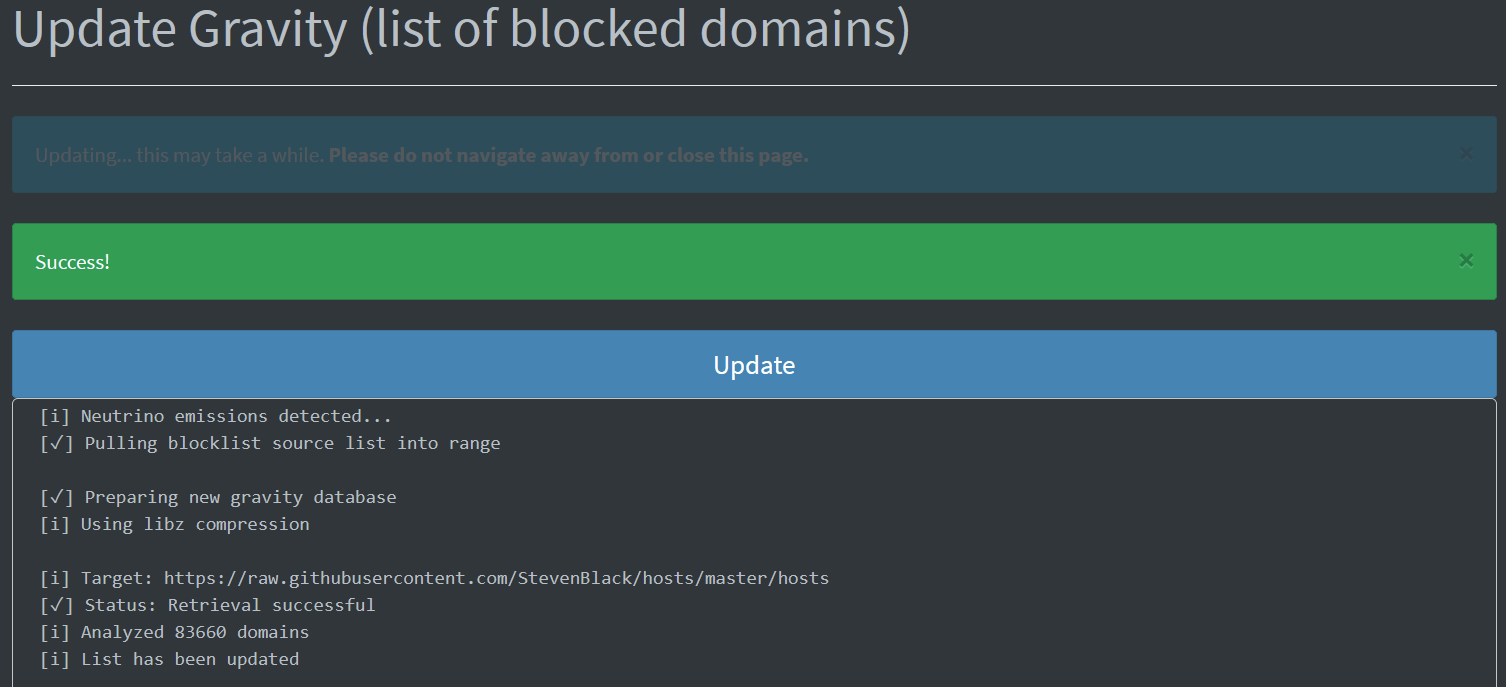
It takes about 20 seconds to update everything for my lists, and I do this manually a few times a month.
Configuring the network for Pi-Hole
Now the only thing left is to configure the local network to use Pi-Hole. This was easy – I’m invested in the Unifi-line of networking gear, so my DHCP server sits on the central firewall/management device. I reconfigured my DHCP so that the Pi-Hole IP address is the primary DNS. If that fails, I have secondary and tertiary from CloudFlare (see my thoughts on that here) and Google. Obviously, if Pi-Hole fails, my telemetry and ad-blocking actions fail also -, but that’s acceptable, as everything still works for the rest of the family.

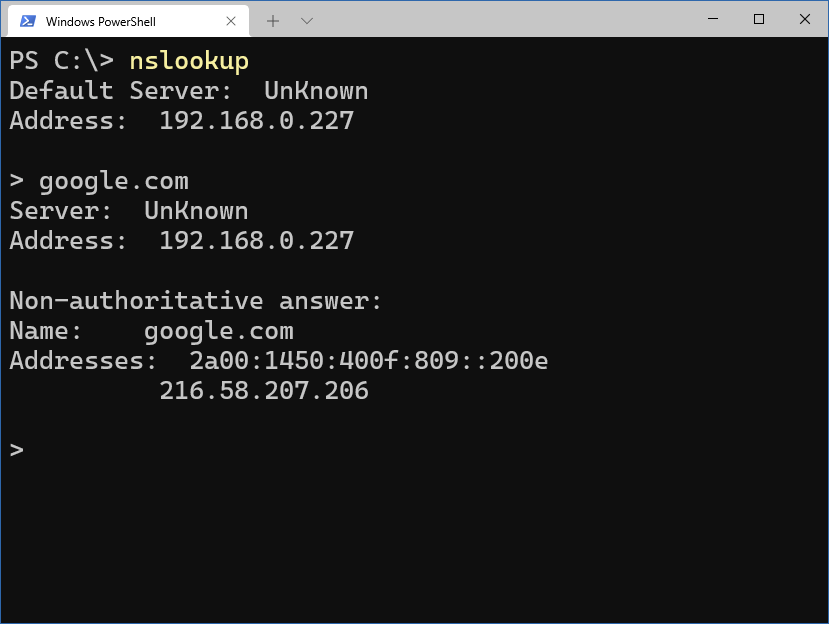
Verifying on my main workstation, I can see that Pi-Hole is being queried:
Monitoring Pi-Hole
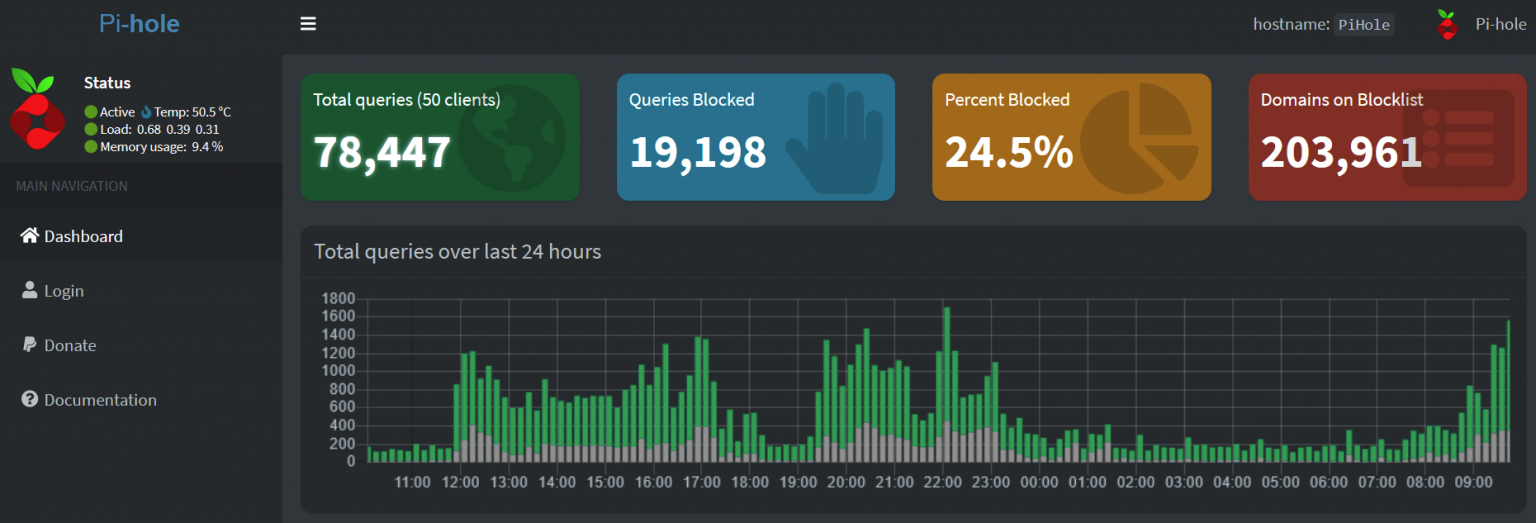
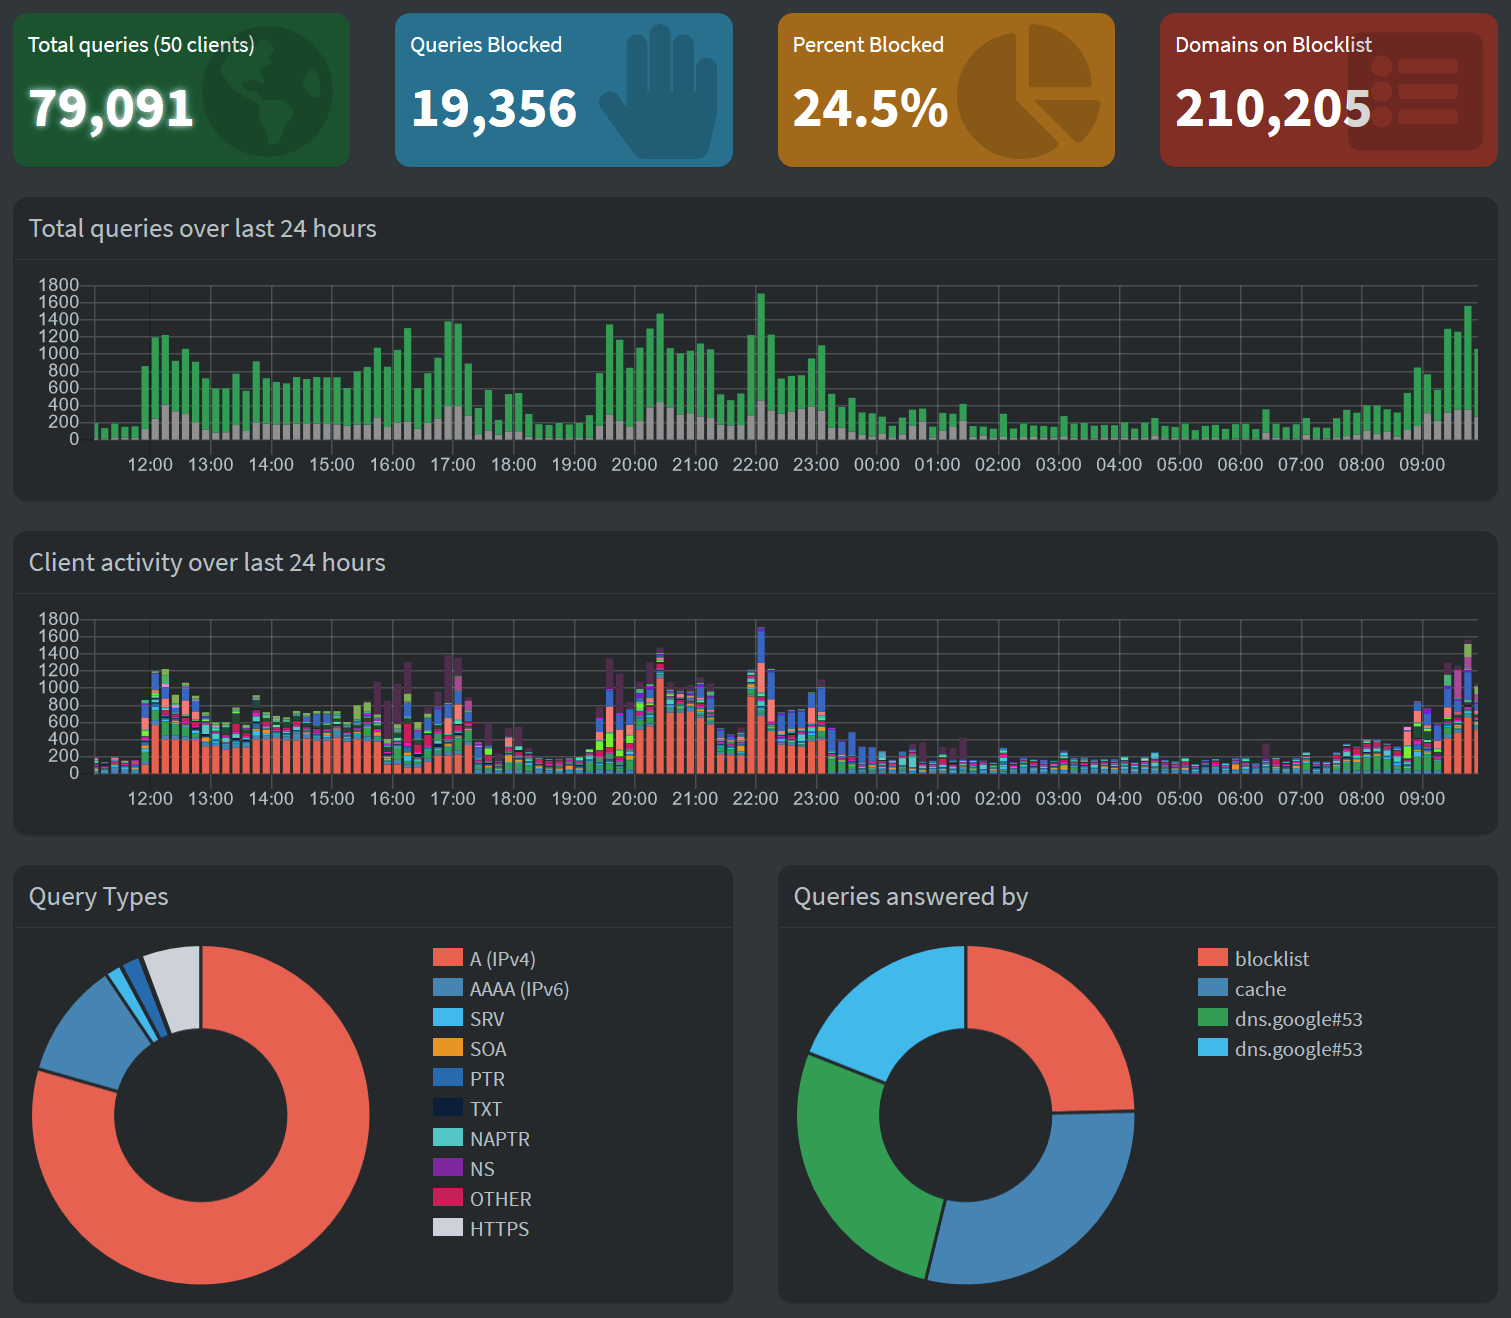
So, is it worth the trouble of setting all this up? Let’s see from Pi-Hole! Within the admin interface, I can see the main statistics:
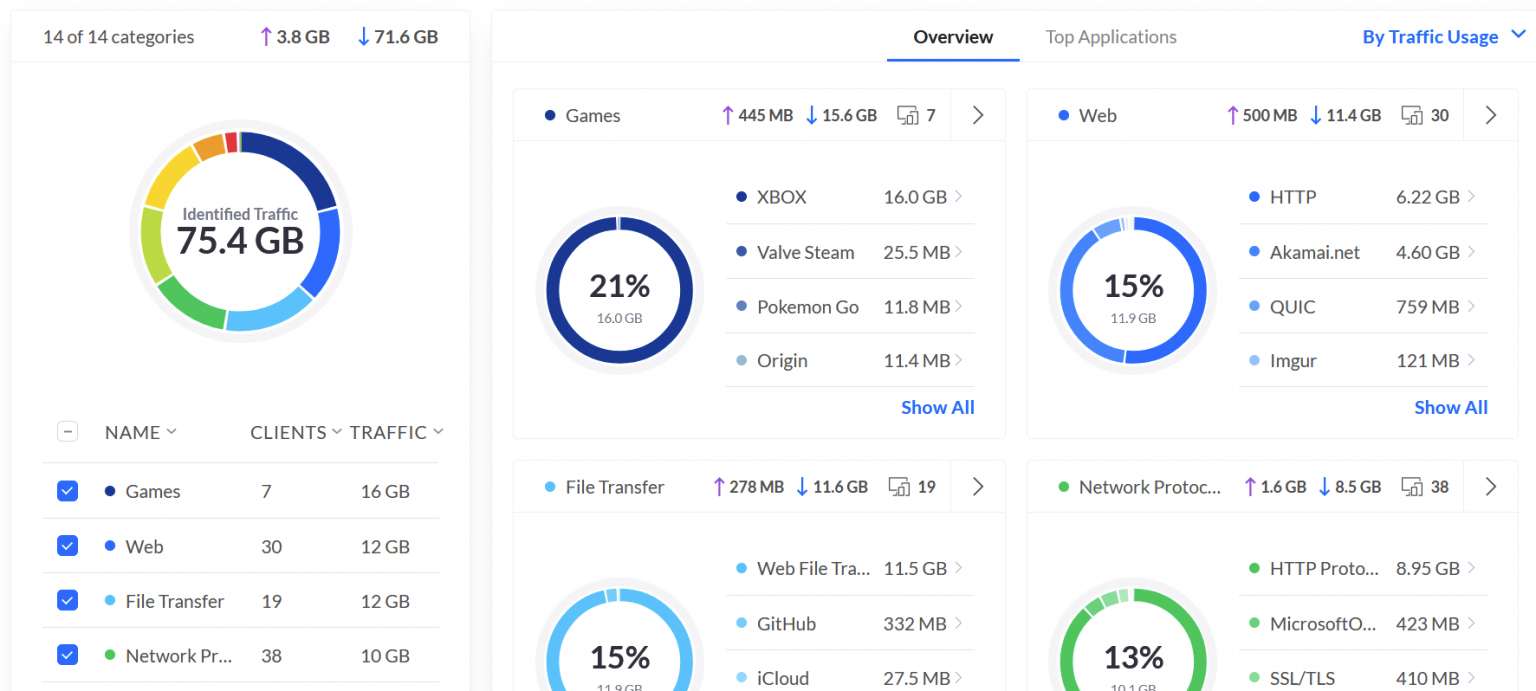
75 GB of traffic, most inbound – games, Netflix and other streaming, regular file transfers, web browsing – the usual. So taking this into account, quite a bit of traffic was abandoned by Pi-Hole. Not 25 GB specifically, as it’s just the number of queries that was 25%, but it’s definitely in the multi-gigabytes range.
But why is Pi-Hole stating that while plenty of traffic was discarded, some traffic – a healthy portion – was served from Google? That’s because Pi-Hole is using Google’s DNS services as upstream DNS services. You can configure this to your liking in the Pi-Hole admin interface under Settings > DNS.
Let’s take a look at long-time statistics. In Pi-Hole, I checked for long-term data and set the time range to 30 days:
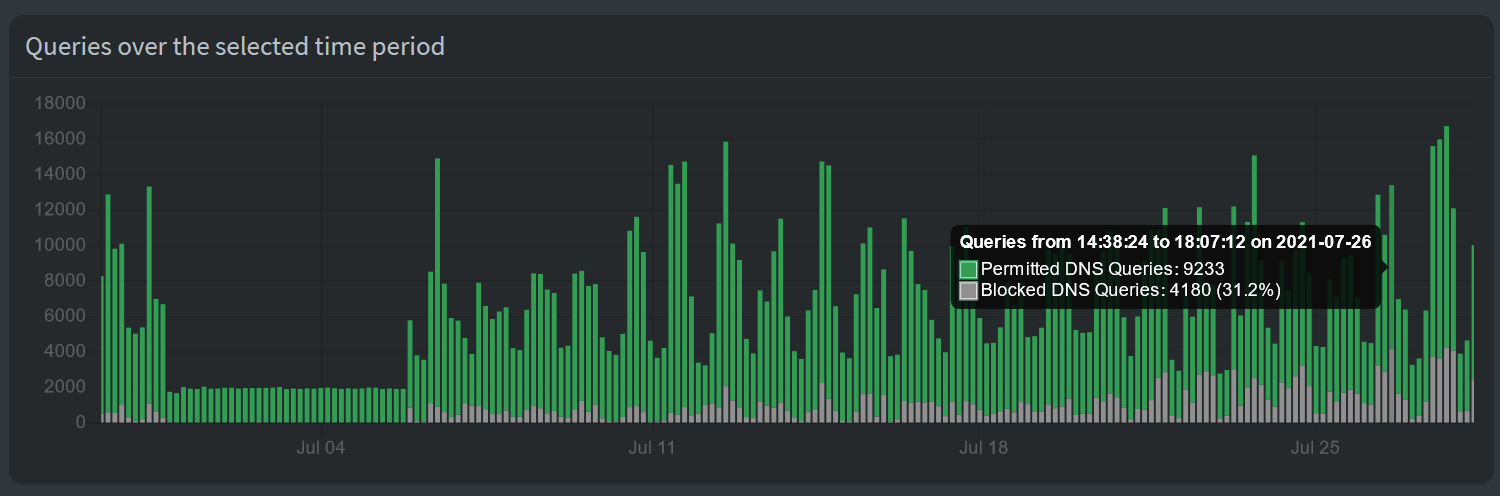
On certain days, more than 30% of DNS queries were blocked.
In closing
So far, I’ve had Pi-Hole running for a few months. It’s been very stable, and I’ve only restarted if a new Docker container image has been published. This has been transparent to my users. A few times, someone in my family mentioned that “X doesn’t work” because some telemetry is required for a specific game to run. I’ve then allowed in Pi-Hole a specific domain or a specific workstation for a period of time to ensure things work smoothly.
I’m not inherently opposed to telemetry and ads. But I’m opposed to having 25% of my DNS queries useless to me, without a chance to opt-out or configure how much I’m willing to give my data for someone else to analyze and benefit from.
Jussi Roine
Microsoft MVP and consultancy founder with 30+ years of experience, passionate about Microsoft security, AI governance, and sharing what I learn along the way.