How to run business logic code as background jobs in Microsoft Azure

Microsoft Azure offers multiple ways to run, schedule and trigger business logic code in the background. Business logic is a fancy way to say you need to execute a series of tasks, based on a process. In this article, I aim to provide a convenient and prioritized list of options to choose from, with the goal of clarifying these options for developers and architects working with Azure.
What is the need to run code in the background?
Many times a need arises when you need to schedule or trigger a bit of code to run based on pre-defined criteria. Your background code could include trivial tasks such as cleaning historical row-based data in a SQL database, or much more complex activities, such as provisioning new Intranet sites in SharePoint with specific functionality.
Depending on the individual need you usually want something simple, easy, robust and cheap to act as your vehicle for executing these tasks. I’ve prioritized the options from the easiest and simplest to more complex options. Your opinion might vary, which is fine of course – the important thing is to know about the different options!
Option 1: WebJobs: easy, simple, affordable
WebJobs are part of Azure App Service. Usually, people refer to App Service as Web Apps, even if Azure App Service includes other services, too. WebJobs are relatively easy to create, deploy and manage in Azure. They are ideally suited for porting existing command-line tools and utilities from virtual machines to run more cloud-native, without re-writing the whole tool.
WebJobs support the following artifacts for execution:
- Usual Windows binaries – .cmd, .bat. and .exe
- PowerShell scripts – .ps1
- Shell scripts – .sh (uses Bash)
- PHP – .php
- Python – .py
- JavaScript – .js (using Node.js)
- Java – .jar
You can create WebJobs through Azure Portal, or programmatically. The practical approach is often to drop your command-line tool or script to an Azure App and configure it for execution. WebJobs can be continuous (meaning that they’ll start immediately and ‘just run’) or triggered (meaning that they execute manually or triggered on a schedule).
To create a new WebJob using the Azure Portal, select an existing Web App, or create a new one and then select WebJobs.
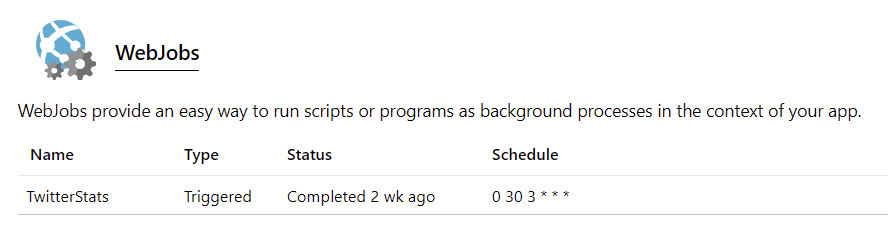
In the example above I’m running a Twitter statistics generator triggered on a schedule. The schedule is based on cron – the (in)famous time-based job scheduler so prevalent on Unix-like operating systems. You specify the minute, hour, day of the month, month, day of the week to execute. A useful service to verify and build these definitions is crontab guru. The actual format is based on NCRONTAB expressions, and you can find plenty of examples here.
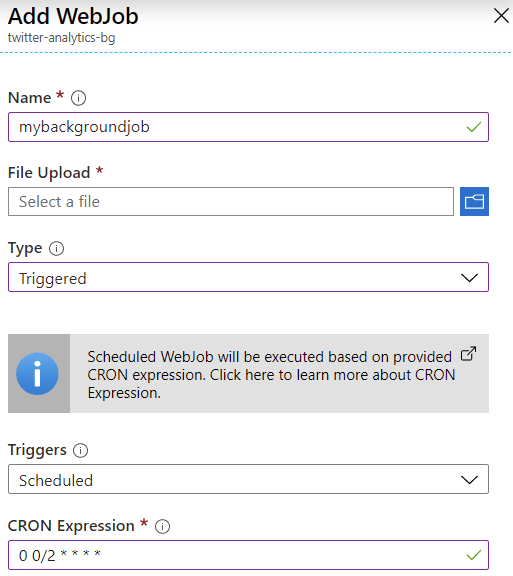
To add a new WebJob, click + Add and specify a name, type (Triggered or Continuous) and scheduling settings. You also need to upload the actual script or binary you want to run.
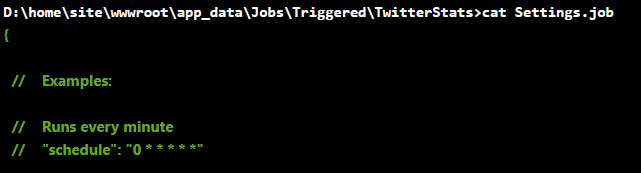
If you later want to modify your WebJob scheduling settings, open the Settings.job file within the Web App’s App_Data/Jobs/ -folder.
The cost of WebJobs is directly proportional to the cost of your Azure App Service Plan. You can view the pricing details here. Keep in mind, that if you need to run continuous WebJobs, you need to have Basic, Standard, or Premium pricing tier selected for the Web App.
Additional resources
Option 2: A scheduled task in a virtual machine: traditional, well-understood
This is the easy one, especially if your background is strongly rooted within on-premises. Scheduling tasks in virtual machines is trivial, but it also brings in additional worries – what happens if your VM is down for maintenance, or the scheduled task fails to run? You need to monitor for this also.
On Windows (workstation and servers), scheduling tasks are done via the Task Scheduler. You can use the MMC-based snap-in to create new tasks or use a command-line tool called SCHTASKS.EXE to provision them through a script.
Here’s one simple example, a local script that executes every 5 minutes, indefinitely:

The script file being executed is a classic .cmd script:
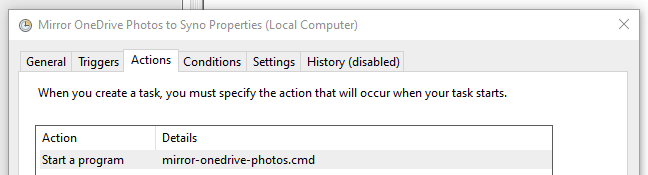
And just for clarity, this example script copies all my mobile phone photos from Microsoft’s OneDrive for Business to my local NAS for backup. I store the photos initially in the cloud, but I also want to have a local copy as a backup for myself.
ROBOCOPY %OneDrive%\Pictures\Camera Roll\2020 \\NAS\photos /MIRI use ROBOCOPY as it’s robust, and it lets me define enough parameters to ascertain my files get copied.
I perhaps wouldn’t spend a lot of time figuring out how to programmatically tweak scheduled tasks in Windows, but rather resort to using SCHTASKS, or PowerShell to let me script it conveniently.
For Linux-based VMs, you’d obviously turn back to cron, which we already had a look at for Option 1: WebJobs. Another option is to have a look at Custom Script Extension that downloads and runs scripts for Azure VMs based on Linux. I haven’t needed to use this myself, but it seems very fitting for those scenarios where you provision a new VM and need it to execute something during post-deployment. Obviously, this falls a bit outside the scope of this post but it’s worth noting this is an option as well.
The cost of running scheduled tasks is directly based on the VM cost. As such, there are no additional costs for running scheduled tasks (either in Windows, or Linux based VMs) other than the cost the VM is incurring you. Keep in mind that if you run resource-intensive background tasks, it will reflect on the performance of your VM while it’s doing other tasks.
Additional resources
Option 3: Azure Function: versatile and flexible
Moving on to Azure Functions. Now we’re talking about serverless. Without delving too deep into the semantics, the essential thinking here is that you don’t need to manage a server, in order to run a bit of code in the cloud.
With Azure Functions, you can define a bit of code, and run that in numerous ways – triggered, scheduled, and manually. In a way, Azure Functions is a modern reincarnation of WebJobs, yet they both serve other purposes as well.
Azure Functions allow you to run code on numerous frameworks, including (but not limited to) C#, JavaScript, PowerShell, and Python. You can view the supported languages and runtime versions here.
To create a new Azure Function, you have multiple options to choose from:
- Build a scriptlet-based Function directly via Azure Portal – great for quickly hacking together little pieces of logic, but does not scale well between multiple developers, or for enterprise environments
- Build locally, deploy to the cloud – much better, as you can compile your code, and test it fully before running it in the cloud. Typically you’d use Visual Studio or Visual Studio Code for building it locally
- Build locally, deploy through automation – you could deploy via Azure DevOps, Azure Cloud Shell, through a PowerShell script, package it and deploy through a template. This is usually defined through the model your team or company chooses to use for deploying code to production (and other environments).
You can also run Azure Functions locally on your development environment, before pushing them to the cloud. This is ideal when you want to tweak and test your logic fully, before incurring cost from the cloud.
Azure Functions introduce many other capabilities, such as monitoring, security considerations, and integration capabilities. As such, it’s more complex than the previous examples but also easy, to begin with.
The cost of Azure Functions is a little bit trickier. Familiarize yourself with the pricing options here. In essence, you pay per execution time (of your code), and for the number of executions. You also get an allocation of 400,000 GB-s free execution time per month and 1 million total executions for free for the month. Key here is GB-s, or gigabyte seconds, which is the unit to measure resource consumption for your function executions.
A separate premium plan exists, where you pay per vCPU and memory consumption. See the pricing options page for details. You could also run your Functions within an App Service, thus paying for those rates instead.
Additional resources
Option 4: Azure Automation-based runbook
Next, we have Azure Automation. It’s often considered as the IT Pro automation engine, a bit like System Center Orchestrator was back in the day. For me, Azure Automation often feels like the modern equivalent to Windows Task Scheduler, as there is a heavy focus on automating processes and managing configurations.
You can run runbooks that are authored in PowerShell or Python. You can also utilize PowerShell Desired State Configuration (DSC), which allows for an easy approach to configuring virtual machines to the desired state – such as “You should have IIS and .NET Framework installed“, without explicitly writing out a script to install those.
A sample script for PowerShell DSC, that installs Windows’ Internet Information Server, would look like this:
configuration WebConfig
{
    Node IsWebServer
    {
        WindowsFeature IIS
        {
            Ensure               = 'Present'
            Name                 = 'Web-Server'
            IncludeAllSubFeature = $true
        }
    }
}
You can then import this file as a .ps1 script to Azure Automation, and have it run for a target VM.
The pricing of Azure Automation is relatively simple: you get 500 minutes for free to run your jobs each month, and additional minutes cost you 0.002 €. Configuration management is free in Azure, and outside Azure, each node will cost you 5.0598 € (first 5 nodes are free).
Additional resources
Option 5: Logic Apps
Next, we’ll take a look at Logic Apps. This is the heart of the integration story in the cloud for Microsoft. In a way, Logic Apps combines the best of both worlds – the flexibility of Azure Functions and scripts, and versatility and robustness of BizTalk Server. With Logic Apps, one can build orchestrations that integrate, process and perform actions with data. You can also call Azure Functions and treat them as proper APIs. Recently, Logic Apps also introduced a way to embed inline JavaScript in the workflow.
With Logic Apps-based workflows, one can build very complex solutions. This is aided greatly with its built-in Workflow Definition Language, which allows declarative presentation for your data, such as introducing literal values during design time.
I’ve used Logic Apps quite often, and one of the latest solutions I built was a monitoring solution for Office 365 service availability.
You can create Logic Apps using Azure Portal and its graphical designer, and you can also use Visual Studio to properly package and design your integrations.
The pricing for Logic Apps is based on the number of executions for Actions, Standard Connectors, and Enterprise Connectors. Executing an Action would cost you 0.000022 €, a Standard Connector would cost you 0.000106 € and an Enterprise Connector execution would cost you 0.000844 €. Very small sums, but once you run a Logic App thousands of times, or perform loops, they can add up quickly. You can view the available connectors here.
Additional resources
- Workflow Definition Language Schema
- Create a Logic App using Azure Portal
- Create a Logic App using Visual Studio (or VS Code)
Option 6: Using containers
And we’ve finally reached the last viable option – using containers! This is a topic that is both wide, and deep.
I wrote about containers in Azure extensively in early 2019, in my adventures in containers and command-line tools article.
Since then, the landscape has matured quite a bit, and looking from Azure Marketplace the top 5 options include:

Kubernetes (or k8s, as it’s affectionately often called) is the managed and orchestration service for containerized applications. I don’t claim to be a Kubernetes expert, as I’ve rarely had to implement solutions that would require the enterprise-grade features of the service.
If you’re just getting started with Kubernetes, it’s perhaps best to first check out this video on how Kubernetes works. The overview of Kubernetes is also a fun read.
In other instances, if your need is to simply run a container, you might want to look at:
- Azure Container Instances, that allow you to run a single (or multiple) containers in an easy way
- Web App for Containers, allowing you to run custom containers with Azure App Service
- If you’re coming from an IT Pro background, this primer on the differences between containers and virtual machines is great
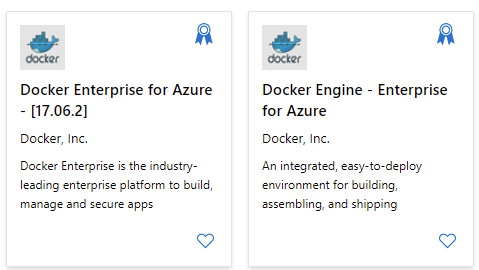
You can also opt to use Docker, and run it in Azure with Docker Enterprise:
In summary
A lot of options to choose from! When I set out to write this article, I thought it would take a few minutes to outline WebJobs and Azure Functions. The further I got to writing this, the more options I felt would be warranted to add to the list. I’m sure there are other options, as well, but I feel these are the core ones, and the ones you should first look at.
I like to keep things simple, so I often start with WebJobs or Azure Functions, and gradually build from there. Unless, of course, you have an immediate need for some of the more advanced capabilities of containers or Logic Apps.