Upgrading my home office network to 10 Gigabit Ethernet speeds - one step at a time

My home network is a regular LAN, built mostly with Unifi devices using 1 Gigabit Ethernet. I’ve extended the wifi, made a VPN to the cloud, played around with different devices within the network, and generally, I’ve been pleased with the topology. On any given day, I have about 30 devices connected to my network – most of them wirelessly, and about 10 are wired.
With the new Synology DS1821+ device, I grew curious about what it would take to start shifting from 1 GbE to 10 GbE backbone. My Internet connectivity is a healthy 1 Gbit/500 Mbit, but internally I often work with large files where 1 GbE connectivity seems to struggle.
The Synology NAS device natively supports 4 * 1 GbE, which supports link aggregation. However, it’s worth noting that this approach is primarily intended for multiple clients sharing the bandwidth, rather than one client gaining 4x speeds over a regular Ethernet.

To start my journey towards that elusive 10 GbE setup, I checked what Unifi has to offer. My current Unifi switches are managed but cap out at 1 Gbps per port, or 16 Gbps internal switching capacity. A good upgrade would be the UniFi Switch 6 XG PoE, with four 10 Gigabit ports and two 10G SFP+ ports. It’s $599, and my usual vendor sells this for 438 € (without taxes). It isn’t an outrageous ask, considering that 10 Gigabit switches are often four figures, to begin with.
However, as you might recall, I’m planning to build a more respectable network in our future house – and for this, a 4+2 port switch isn’t going to cut it. And in my current home, I don’t need a 24 or 48 port 10 Gbit switch yet. And one thing that I did learn during my Executive MBA studies is that the time value of money is important to consider.
Starting small: Synology and 10 GbE
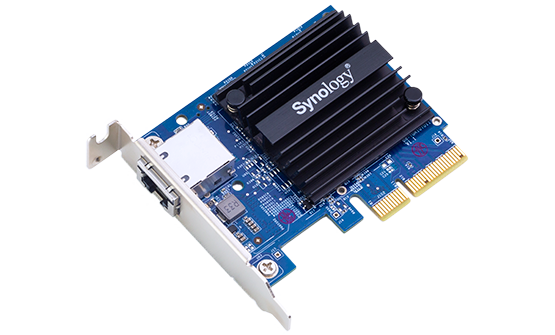
I then opted to start small and try out what works and what’s worth the additional cost. The Synology device supports add-in cards in the form of PCI cards. They are regular PCIe 3.0 8x cards with different capabilities. I purchased the Synology E10G18-T1 card, which provides one RJ-45 port up to 10 Gbps. It looks like this:
It installs neatly within the Synology enclosure, and pops up within Synology’s own control panel:
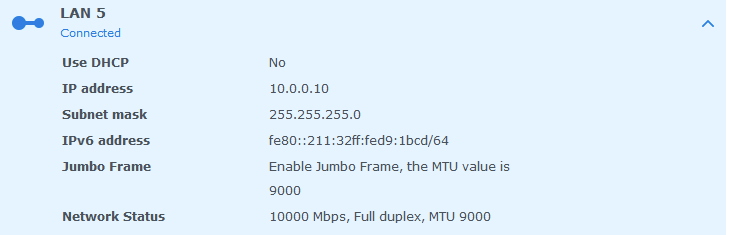
Synology also exposes a bit more details about the card:
[ 26.291971] Intel(R) 10GbE PCI Express Linux Network Driver - version 5.1.3I enabled Jumbo Frames for the new network adapter by setting MTU to 9000. There are arguments for and against using Jumbo Frames, but thankfully it’s easy to test within a local network if it helps at all. VMware published a study, and for the benefits of Jumbo Frames it neatly states “Thus, with jumbo frames, a single virtual machine can saturate a 10Gbps link on the transmit path and its receive performance can improve by up to 40 percent in some cases.” (Source)
Now that Synology presumably was done, it was time to focus on the other end – the server.
Windows and 10 GbE
My plan is to install a similar 10 GbE network card to my server, and connect it directly with the Synology over a Cat7 Ethernet cable. This way, the server and Synology can operate at higher bandwidth, while the rest of the network can enjoy less congested 1 Gbps speeds.
There are plenty of 10 GbE PCI cards to choose from. I initially planned to get the Intel X540-T1 PCI card, but it was about 400 €. For comparison, a mostly similar network card that I got for the Synology was about 150 €. Then I found the Asus XG-C100C 10 Gb PCI card, and it’s only 99 € (with taxes!).
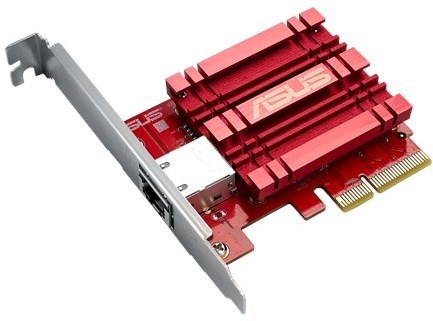
Also, it’s red. That must count for something.
Installation on my server was a breeze. I now have three Ethernet adapters – the built-in 1 Gbit, an external 1 Gbit (for better performance), and this new 10 Gbit adapter.
I also enabled Jumbo Frames on the server-side and tweaked a bit with some other additional settings I felt could be useful. The server’s IP address is 10.0.0.20, and the Synology’s IP Address is 10.0.0.10, and these are the only devices utilizing this network.
Time to test the speeds!
First speed test
I used the AJA System Test to test the speeds. The app runs on the server, and connects with the Synology NAS’s file share to test read and write speeds.
The first run was a disappointment:
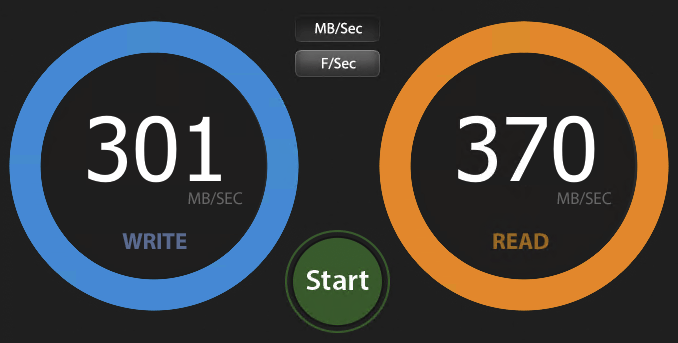
Okay, 301 MB write is nothing to scoff at.. but it also isn’t even in the ballpark of the transfer speeds I was expecting. My Synology only has 4 WD Red Pro drives, each at 7200 rpm. Some people suggested to me that I’d need to fully equip the Synology with 4 additional drives, and only then I’d get proper speeds. But each WD Red Pro is about 400 €, so just putting down 1600 € to “verify speeds” is not an investment I’m willing to make right now. Also, I don’t need the capacity yet – just the speeds.
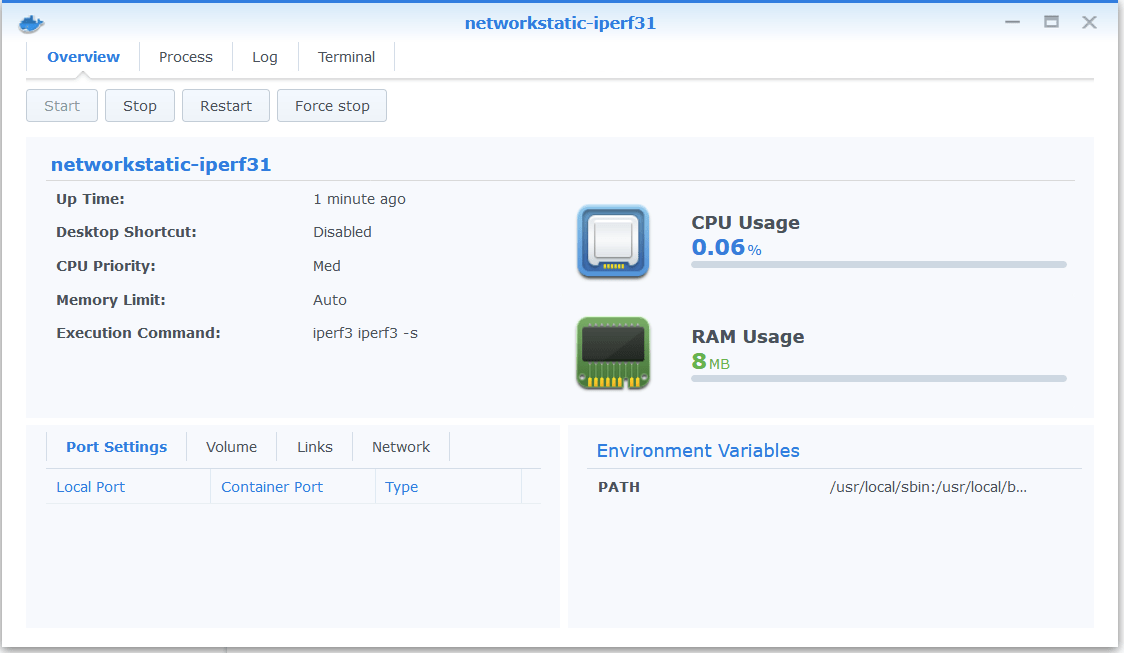
Back to tinkering settings. I then loaded iPerf3 in a Docker container on my Synology and ran another speed test. Perhaps the issue is with hardware rather than the software I use to test the setup.
Synology natively supported Docker-based containers, so it’s a breeze to get the iPerf3 server daemon up and running:
Running the first test with iPerf3 yielded the same results:
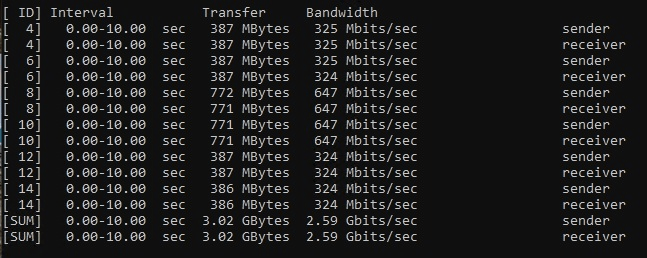
About 2.59 Gbit bandwidth, which roughly translates to 0.33 Gigabytes or ~330 Megabytes. Even if it’s about 230 % better than previously with my regular 1 Gigabit connectivity, I was torn.
I spent a few more hours fiddling with numerous network settings. The Cat7 cable is UTP (Unshielded Twisted Pair) and not F/UTP or even STP (Shielded Twisted Pair) – and perhaps that is the issue here. I reconsidered when I would be willing to purchase more disks, but I figured that would be just for my own vanity – and not money well spent at this point.
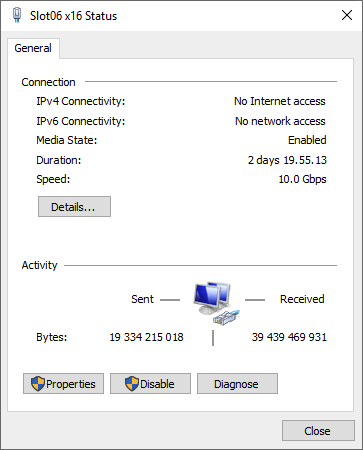
Meanwhile, another PC that we use at home required a GPU upgrade (“Fortnite is not 60 fps!“), so I yanked the older GPU out from that PC. And then, I realized I could utilize this older NVidia GPU on my server for transcoding my media streams. While installing the GPU, I had to reshuffle the existing PCI cards – including the 10 GbE Asus card.. and it turns out, it was connected to a slower PCI lane on the older motherboard I still use. I didn’t know this at the time, though.
Just for fun, I reran AJA System Test, even if the GPU isn’t helping at all – but having the Asus card reorganized to a better PCI slot with better bandwidth. And here we go.
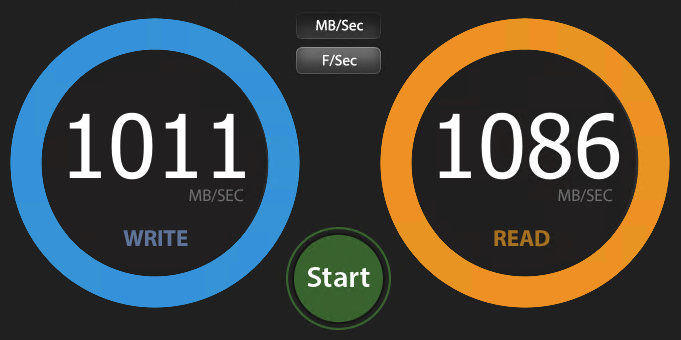
Nothing else changed – the Synology is the same, with 4 hard drives, and the cabling and network configuration is the same. On iPerf3, I can see similar results now:
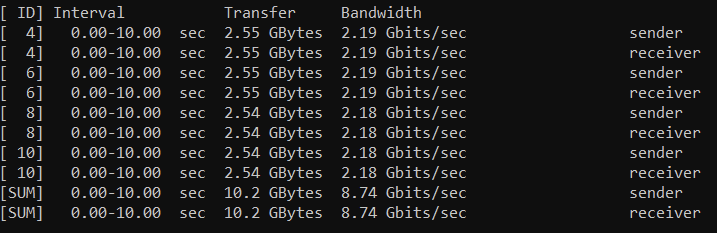
8.75 Gbit bandwidth (up from 2.59 Gbit), pretty splendid!
In summary
This was the very first step in my long journey towards a fully managed 10 GbE internal network. I’m already enjoying the slight benefits – my media streams are lightning-fast, and streaming a 4K movie that utilized HDR ‘just works’ without buffering. Also, my backups are speedier, and I’m not confident I can upgrade the rest of the network in the coming months.
It is a great lesson for me to not simply give up but allow issues to slip into the background and return to them later.