Securing Microsoft Azure in 10 steps

Microsoft Azure, with its numerous services and capabilities, is a significant platform. Depending on what a company might enable or employ from Azure, securing it might be trivial and challenging at the same time. I often consult with organizations of all sizes, and the inevitable question comes up usually during the first meeting: what about security?
I decided to write this article as a starting point for anyone looking to ensure their Azure is secure enough. Obviously, there are numerous other security aspects than ‘just’ configuration and settings – but more on those in another article. I’ve also added a plethora of additional resources under each main step.
The following 10 steps do not require any additional licensing, such as Azure AD Premium. The only requirement in completing these steps is a working Azure subscription. If you don’t have one yet, you can easily provision a (free) trial tenant here.
1. Check your Identity Secure Score and Azure Advisor recommendations
We begin this journey by orienting ourselves with Identity Secure Score. It’s a great dashboard providing you with an easy-to-understand overview of your identity security.
Action: Navigate to Azure Portal > Azure Active Directory > Security > Secure Score. The direct link is https://portal.azure.com/#blade/Microsoft_AAD_IAM/SecurityMenuBlade/IdentitySecureScore
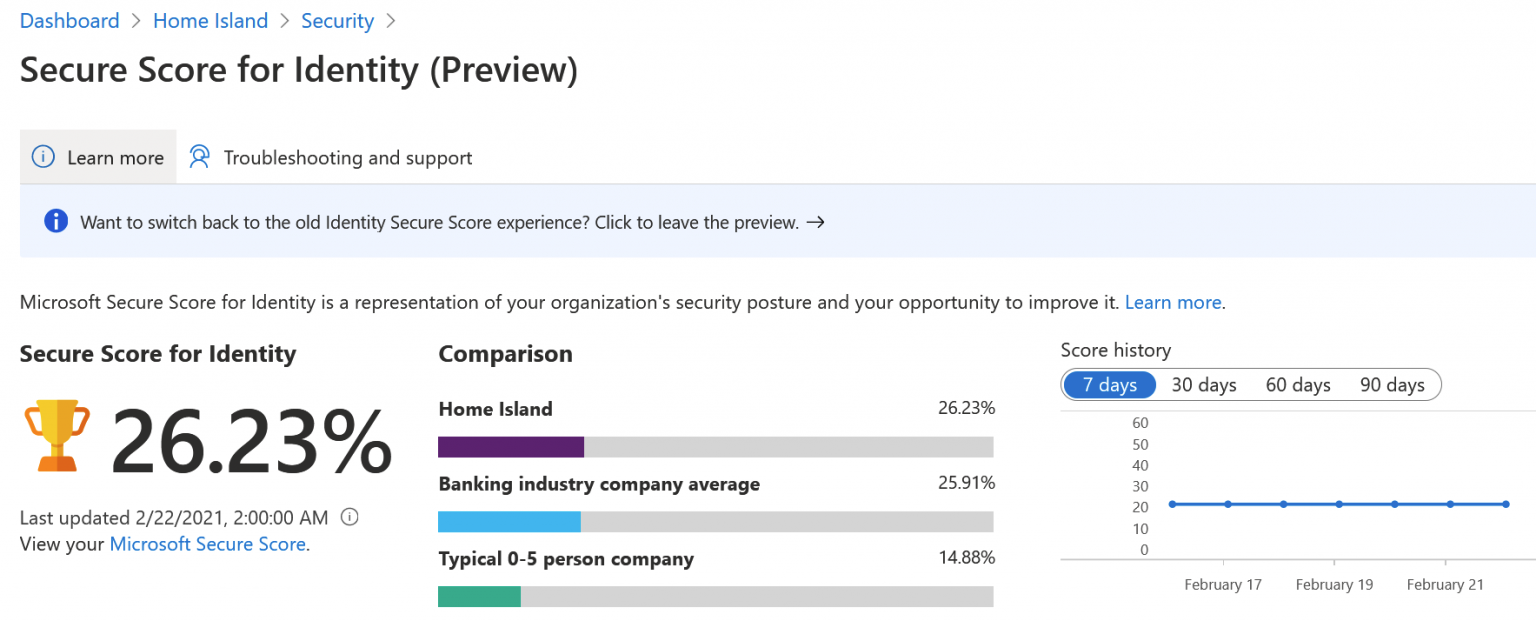
You can see one of my test tenants in the picture, and it’s not looking too good. The view is a preview view, which is publicly accessible. In case you haven’t enabled this new view, the classic view is almost similar:
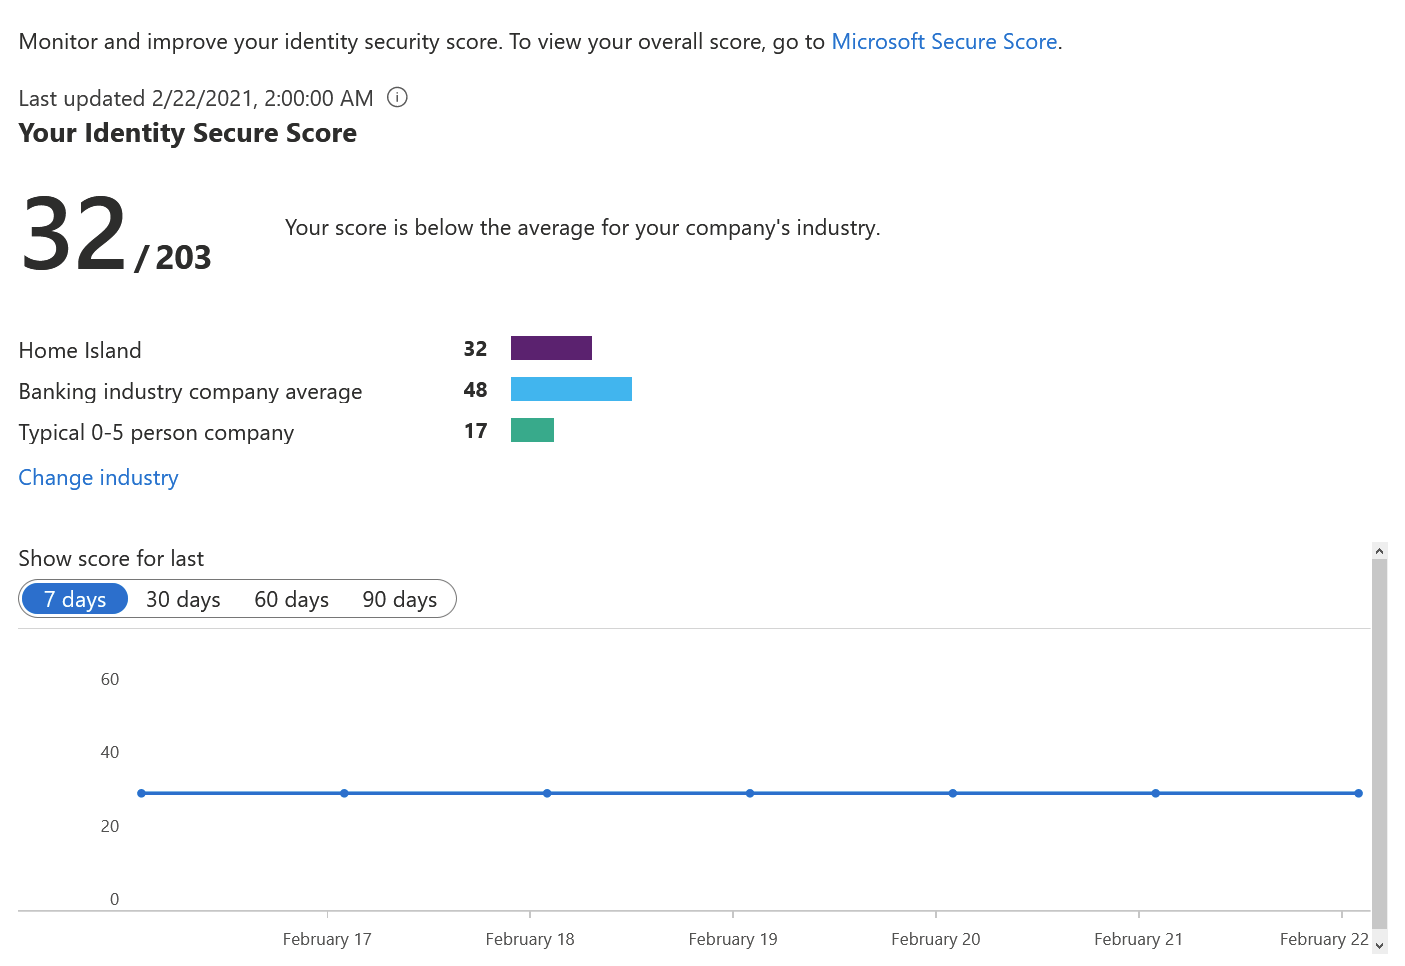
You can see that the newer view shows you percentages (26.23%), and the older view uses an arbitrary scoring mechanism (32/203). Even if the score is rather low, it’s still better than the average for a small company of 0-5 persons.
Below this view, a list of suggested actions is shown. Here’s a snippet of the top-most actions:
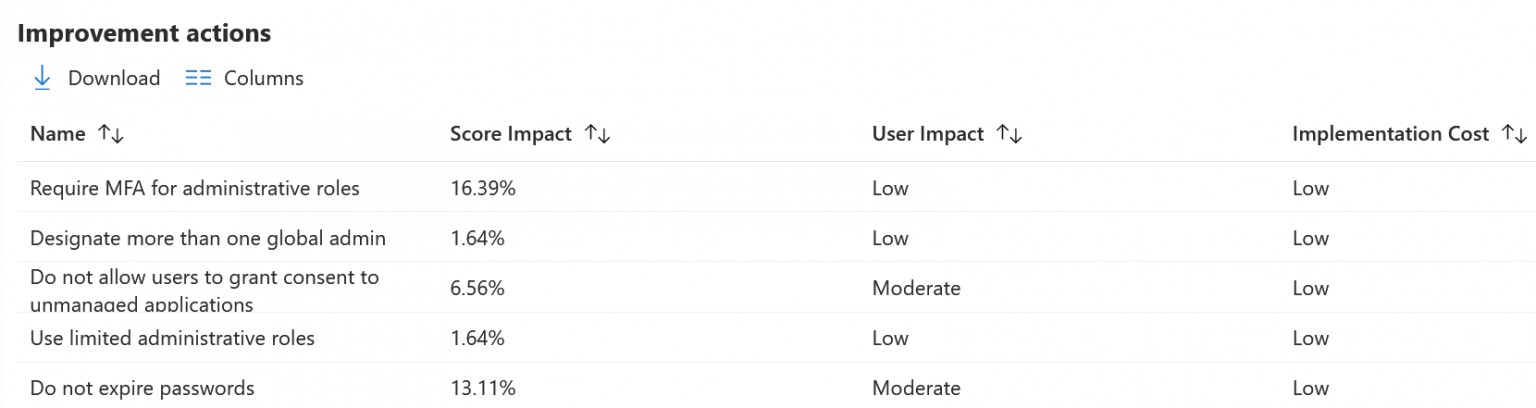
By simply enabling two-factor authentication for administrative roles we’d be at 42.62% already!
Action: Review the suggested actions, and start planning for implementing as many of those as possible.
Next, check Azure Advisor. It’s a more comprehensive list of actions that takes into account several core areas in Azure.
Action: Navigate to Azure Portal > All services > type ‘Advisor’ in the search box > Advisor. Direct link: https://portal.azure.com/#blade/Microsoft_Azure_Expert/AdvisorMenuBlade/overview
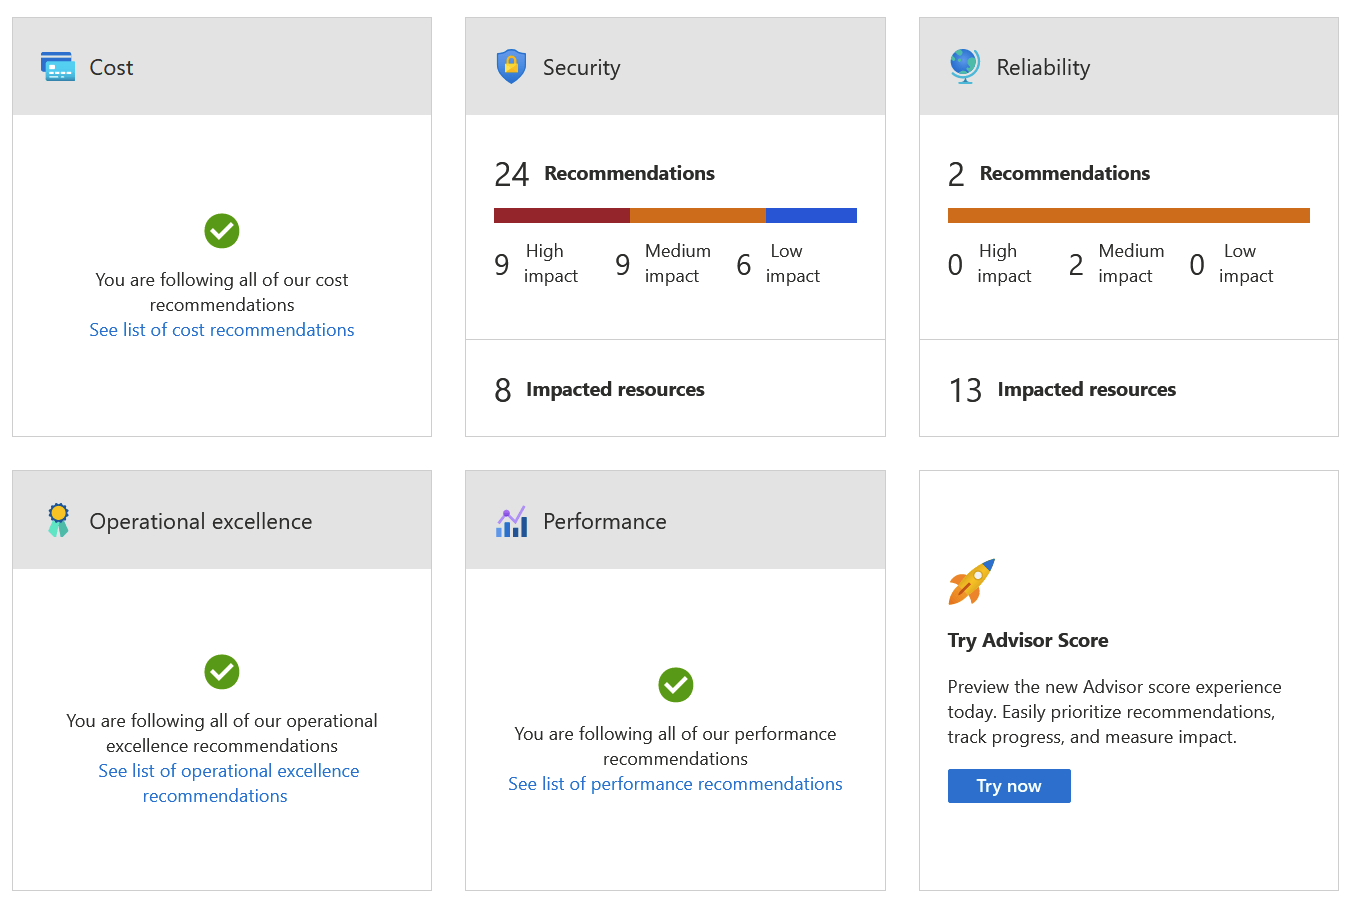
I can see that three are doing well (cost, operational excellence, and performance). Simultaneously, two (security and reliability) have plenty of high-impact items I should tackle.
Advisor Score (the last item that hasn’t been enabled yet in the above picture) is a new element, and it will provide you with a similar score to Identity Secure Score:

When you click on any category, such as Security, you’ll see a list of recommended actions. Some of them have a quick fix button, which aims to fix the issue rapidly. Consider the implications before randomly clicking through these.
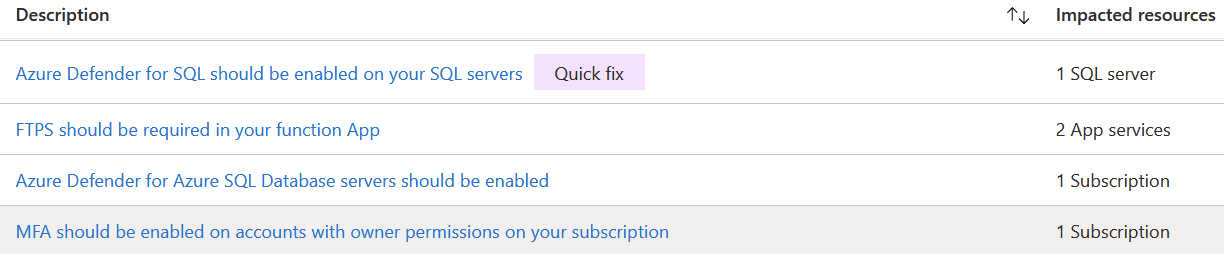
You can see that I should enable Azure Defender for one SQL Server. While the fix is easy, it might require additional licensing or services.
Additional information:
2. Enable and enforce MFA for Administrative roles
Now that we’ve oriented ourselves with the Identity Secure Score and the Advisor Score, let’s implement two-factor authentication for all of our administrative roles. This might affect a single user, dozens of users, or anything in between – so pay attention before implementing this change.
If you’re not familiar with Microsoft’s two-factor authentication, it’s called Multi-Factor Authentication – or just MFA for short. The idea is that the user must possess something beyond just a username and a password – typically a device, such as a secure token, a mobile device with an app, or similar. The traditional approach here is to employ the Microsoft Authenticator app – thus, users must have this deployed on their primary devices. They will then configure it via self-service upon the next login.
Why are we not simply enabling MFA for all users? Well, it would probably break a lot of things – scripts, automation, developers trying to get their work done. The idea is first to enable it for people in admin roles, and then with careful planning, start rolling it out further.
MFA is by no means a silver bullet. It helps massively, but simply switching it on won’t replace proper security procedures, governance, and monitoring.
There are multiple ways to roll out MFA, and some of those do require a premium license for Azure AD (per user). Ideally, we’d like to avoid this, for now, partially to keep things simple but also to save on cost in the long run. You can also opt for the more advanced deployments if you’re familiar with MFA or perhaps if your tenant has hundreds or thousands of users.
The easy approach now is to enable something called Security Defaults. It’s a blanket setting, which, when enabled, will force all users for MFA, including admins, and will also disable legacy authentication (see my previous article on this).
To enable Security Defaults, do the following: Go to Azure Portal > Azure Active Directory > Properties > Manage Security Defaults. Direct link https://portal.azure.com/#blade/Microsoft_AAD_IAM/ActiveDirectoryMenuBlade/Properties. Switch it on, and click Save.
To enable MFA for just admins, do the following: Go to Azure Portal > Azure Active Directory > Users > { select a user } > click Multi-Factor Authentication in the top toolbar. Direct link: https://portal.azure.com/#blade/Microsoft_AAD_IAM/UsersManagementMenuBlade/MsGraphUsers. This will take you to the (very) legacy Windows Azure MFA portal, allowing you to individually enable MFA for select users.

Once you enable MFA for a user, they’ll have to provision MFA via https://aka.ms/mfasetup. Obviously, any user logging in will be kindly guided through this same process once MFA is enabled.
A more advanced approach would be to employ a premium service, such as Azure AD Conditional Access, Privileged Identity Management, or Identity Protection.
Recently, passwordless authentication became generally available also. It’s based on MFA but helps in that users do not have to re-type their passwords – they’ll instead get to choose a random number from the mobile app. See details here. Once MFA is taken care of, consider passwordless as the next step.
Additional information:
3. Enable self-service password reset
As we’ve now enabled MFA for admins, or perhaps even for all users (depending on if you chose to enable Security Defaults in step 2 above), it’s time to allow users to reset their passwords. Sometimes users forget their password, and there is a built-in service within Azure AD to resolve this. It’s worth noting here that admins are always enabled for this service.
In terms of licensing, this is a bit tricky. For cloud-only users, password reset does not require additional licensing (beyond the usual Microsoft 365 licensing). For hybrid scenarios, a premium license is required. See details here.
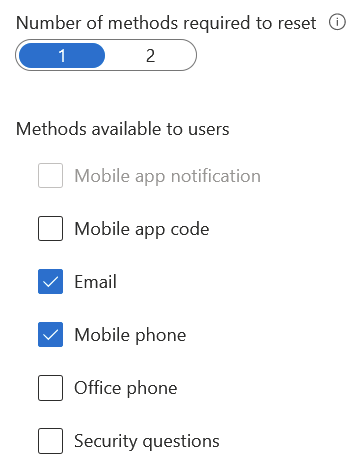
Action: Go to Azure Portal > Azure AD > Password reset > select All. Direct link: https://portal.azure.com/#blade/Microsoft_AAD_IAM/ActiveDirectoryMenuBlade/PasswordReset. You can also pilot with select users first if you wish. Then, select Authentication Methods from the left navi, choose the number of methods required to reset (1 or 2), and the available methods. A good practice is to allow email and mobile phone methods, and for a more secure approach, enable mobile app code.
Next, click Registration on the left navi, and set Require users to register when signing in to Yes. Otherwise, as an admin, you have to populate the necessary (missing) data for each user. You can also ask the users to verify their data at an interval – typically every 180 days.
It’s a great idea to add a helpful link for the users under Customization. Point this to a publicly accessible website, such as https://company.com/helpdesk, where users can reach out if they fail to reset their password.
An additional consideration here is that if users reset their passwords in the cloud (against their Azure AD identities), those new passwords should travel back to your on-premises directory. This is called password writeback, and it’s a setting with Azure AD Connect – the tool that synchronizes identities and relevant data between your local directory and Azure AD. See more details here.
Additional information:
4. Verify legacy authentication is no longer being used
Moving on to securing our Azure estate, it’s time to verify if legacy authentication is still being used. I’ve written about this previously, but to keep this guide consistent and readable, here is the essential information on this.
The usual meaning for legacy auth in the context of Microsoft cloud services includes all those older protocols one could use to access email and other services: SMTP, IMAP, POP, and such. We first need to monitor whether users are still utilizing these protocols and then start blocking them in a controlled way.
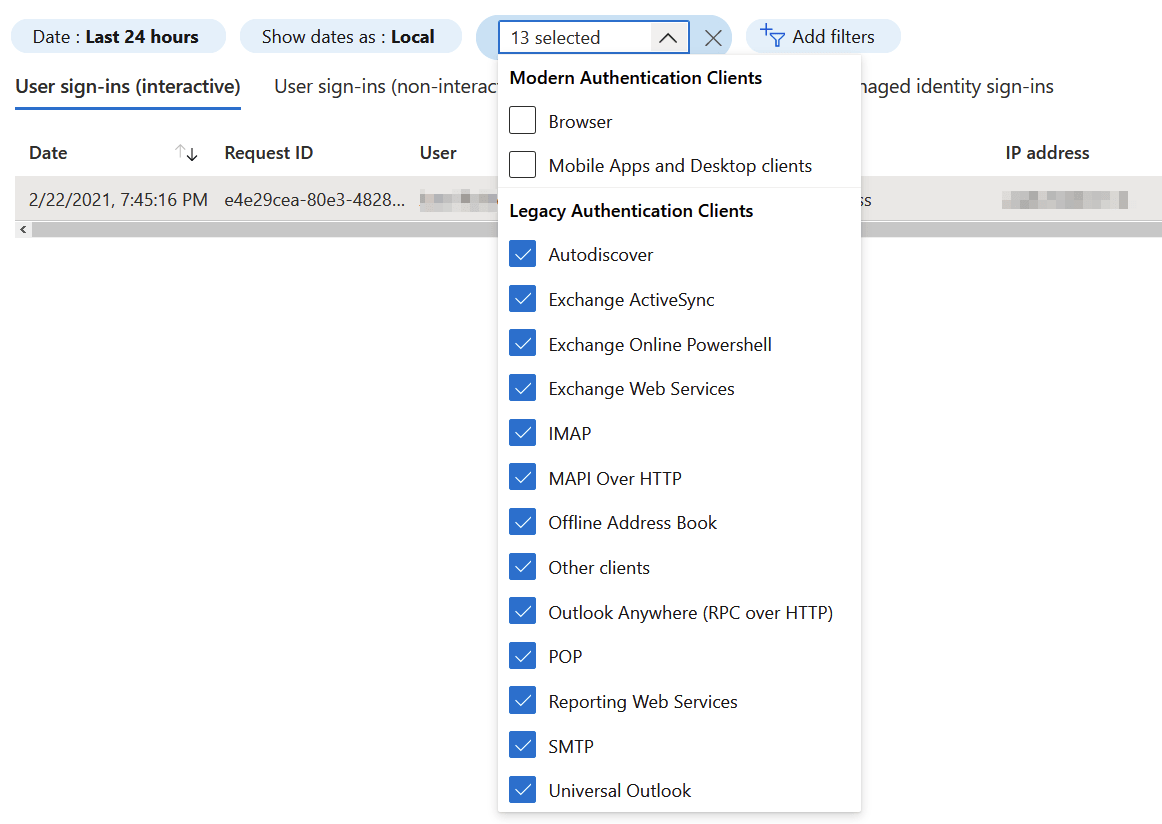
Action: Go to Azure Portal > Azure AD > Sign-ins. Direct link: https://portal.azure.com/#blade/Microsoft_AAD_IAM/ActiveDirectoryMenuBlade/SignIns. Filter based on Client App, and then select all 13 legacy protocols. It’s crucial to check both user-signins (the first tab) and the other sign-ins (three other tabs).
Depending on the results, you’ll need to work with your users on alternative authentication approaches. There might be a legacy device that checks for emails in Exchange Online, and simply blocking it might break an important service or tool.
Once you’ve confirmed that legacy auth is no longer used, you can block it by enabling Security Defaults (see step 2 above). Alternatively, you can employ Azure AD Conditional Access for more fine-grained filtering and blocking, but this requires the Azure AD Premium licensing in use.
Additional information:
5. Get started with Azure Security Center
Great progress so far! We can now start utilizing more advanced services when the basics are taken care of. Azure Security Center (or just ASC for short) is a complex beast but highly useful – and frankly, a service that one has to master to maintain a secure posture in the cloud.
Let’s first check where we are with ASC:
Action: Go to Azure Portal > Security Center (from the left navi). Direct link: https://portal.azure.com/#blade/Microsoft_Azure_Security/SecurityMenuBlade/0
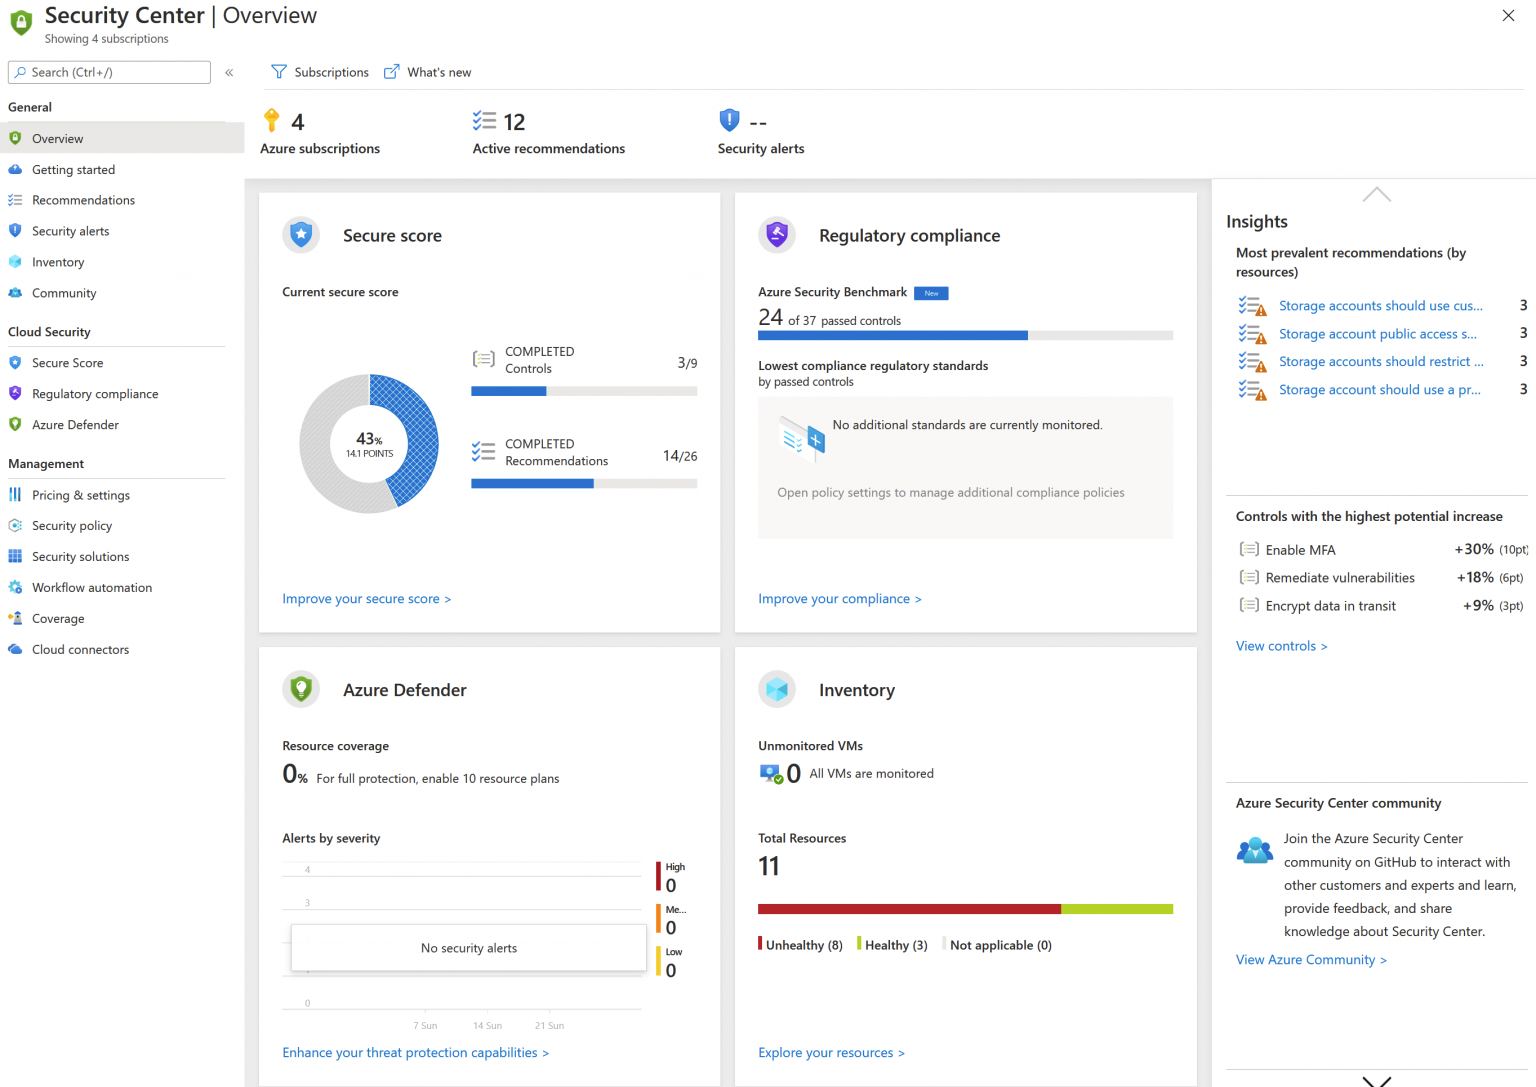
There is a lot to digest here. You’ll also see many identical insights and actions from previous tasks and yet another secure score. This is the Secure Score, and it’s an instrumental insight into the security of all of your subscriptions.
Let’s start by verifying our pricing setting:
Action: Go to Azure Portal > Security Center > Pricing & Settings. Direct link: https://portal.azure.com/#blade/Microsoft_Azure_Security/SecurityMenuBlade/24. Depending on your Azure subscriptions’ structure and governance, you’ll see a tree of management groups, subscriptions, and workspaces. Azure Defender plan should be off by default, as it requires additional licensing to become available. Select a subscription from the list, and then select Email notifications. Ensure you are configured for receiving emails from ASC – you can leave the setting to High.
Next, work on the recommendations (select Recommendations from the left navi in ASC main view). The intention is not to get a clean list but to recognize if there are still (after steps 1-4) some crucial actions that need to be completed.
Beyond this, you’ll have to invest in Azure Defender licensing to unlock additional capabilities.
6. Configure base Azure Policy settings
Moving on to Azure Policy, which is a key building block of the overall Azure Governance story. If you come from an on-premises background, you could think of Azure Policy as Active Directory Group Policy Objects (GPOs). They are not identical but share many traits.
Many government services are intertwined, so while aiming to keep this simple, I’m not delving super deep into all aspects of Azure Policy. I have a (free) book for that! The idea is to use the built-in Azure Policy definitions and assign them at a suitable level. Some definitions are bundled together as initiatives, and they might hold dozens of policies together.
I would advise beginning with baby steps. If you aim to have one Azure Policy to rule them all, it might just work, but usually, it just causes havoc and confusion.
Let’s begin by navigating to Azure Policy in Azure Portal and checking what policies we have:
Action: Go to Azure Portal > { search for: policy } > Policy. Direct link: https://portal.azure.com/#blade/Microsoft_Azure_Policy/PolicyMenuBlade/Overview.
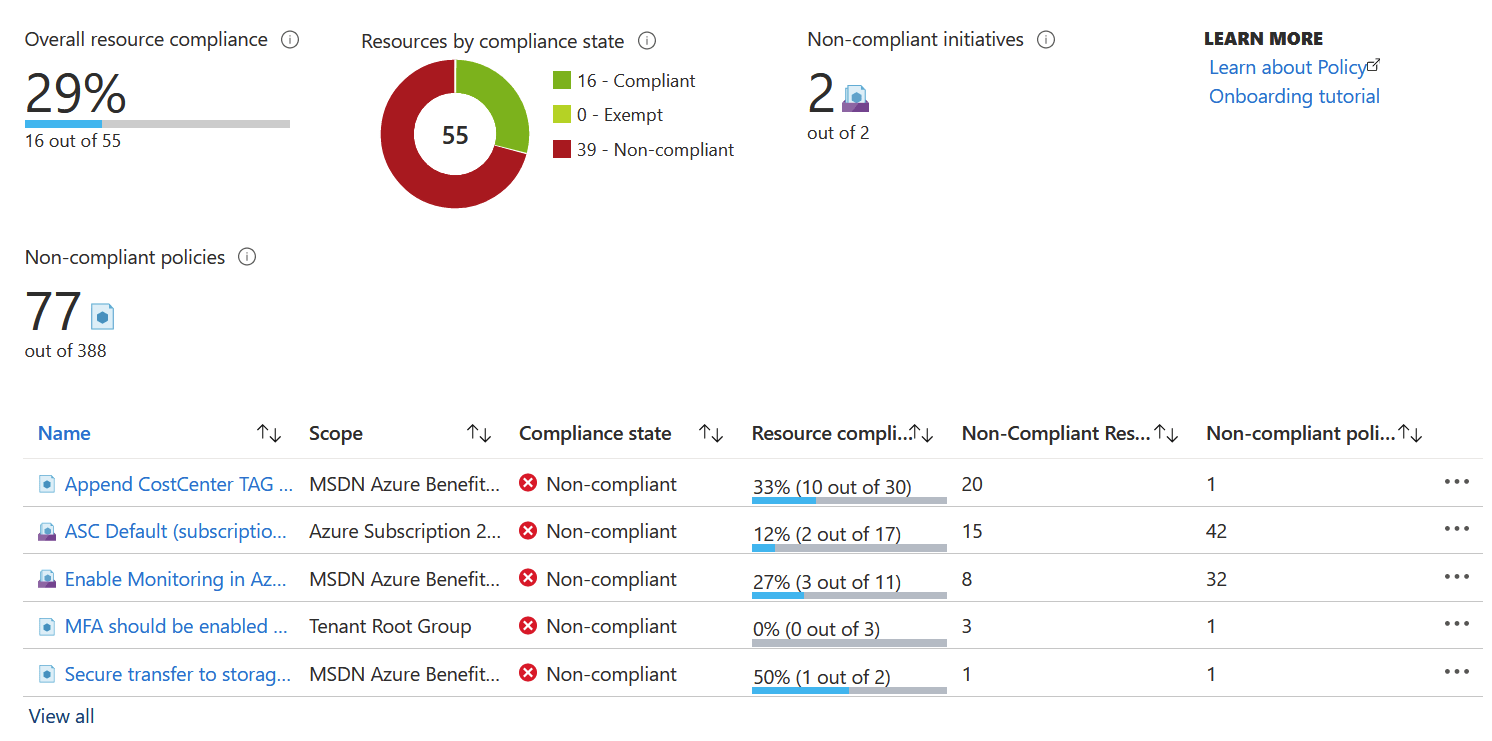
You can see from the image above that I have just a 29% resource compliance – based on the few policies I’ve set for one of my subscriptions. Usually, you’d aim for 100% resource compliance. When I open a policy from the list – such as the “Secure transfer to storage accounts should be enabled” I can drill in what resources are non-compliant.
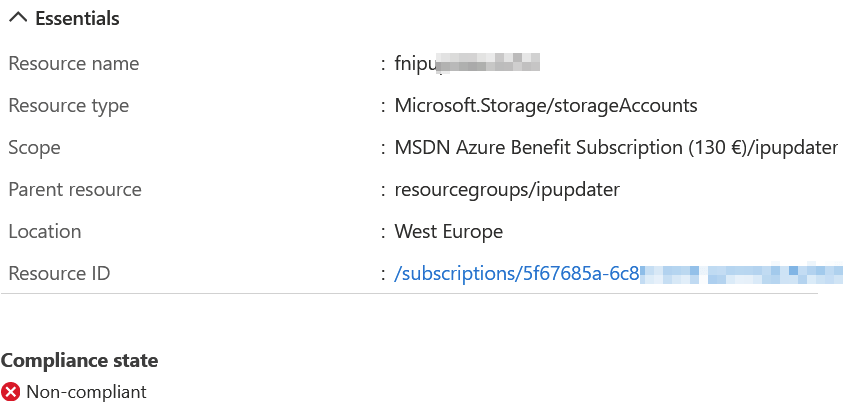
It seems like I have one Storage account that does not enforce secure transfers. I can fix this manually and then have the policy re-validate the status. You can perform on-demand scanning of policy changes with Azure PowerShell.
Get acquainted with the existing (built-in) policies. You can view them all within Azure Policy > Definitions. Not all need to be enabled, but typical ones I tend to begin configuration with include:
- Require a tag and its value on resources
- Secure transfer to storage accounts should be enabled
- Azure Backup should be enabled for Virtual Machines
- Allowed locations
- Disk encryption should be applied on virtual machines
- Internet-facing virtual machines should be protected with network security groups
Get started with a few core policies, and build from there. You can apply policies at numerous levels, so it’s useful to get acquainted with the location for Azure Policies here.
Additional information:
Get started with Azure Sentinel
Moving on to Azure Sentinel next. It’s the SIEM (Security Information and Event Management) solution in Azure. While relatively new, it’s the sibling to Azure Security Center. It has many useful capabilities for revealing anomalies, figuring out malicious events, and hunting down possible threats.
I’ve written about Azure Sentinel previously on getting started, even after more than a year, it’s all still very valid.
Azure Sentinel requires one (or more) Log Analytics Workspaces. The general idea is that you route all your events and logs to one (or more) Log Analytics Workspaces and then have Azure Sentinel crawl through that to figure out what actions need to be taken. You can then connect additional data sources through connectors – such as Office 365.
Action: Go to Azure Portal > Azure Sentinel. Direct link: https://portal.azure.com/#blade/HubsExtension/BrowseResource/resourceType/microsoft.securityinsightsarg%2Fsentinel. Select the workspace you want to work with.
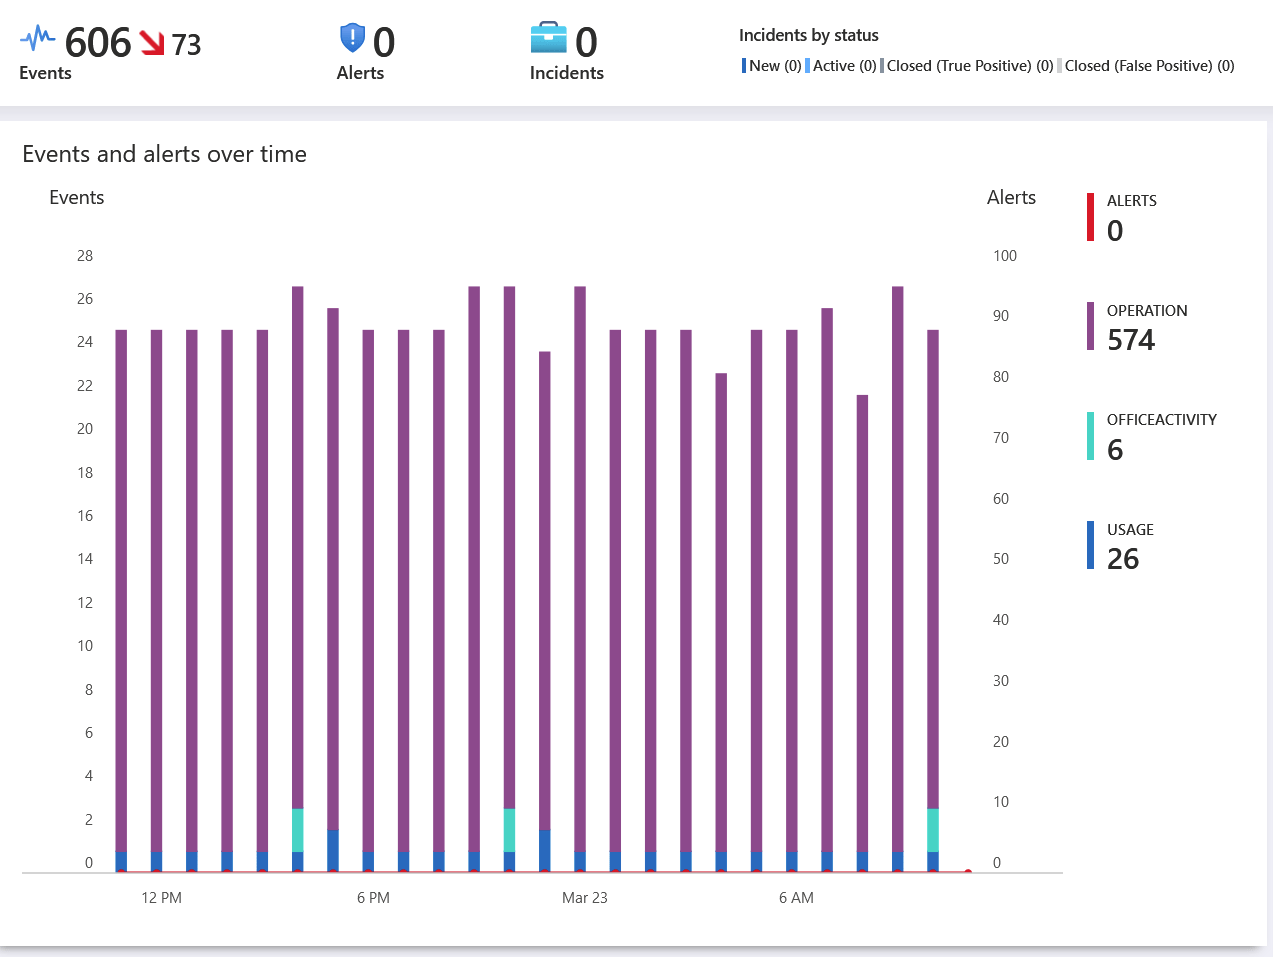
You can see from the image above, that I had 0 alerts in the past 24 hours in one of my Azure subscriptions. Clicking Data connectors from the left navi, I can start adding connectors to enrich the analysis.
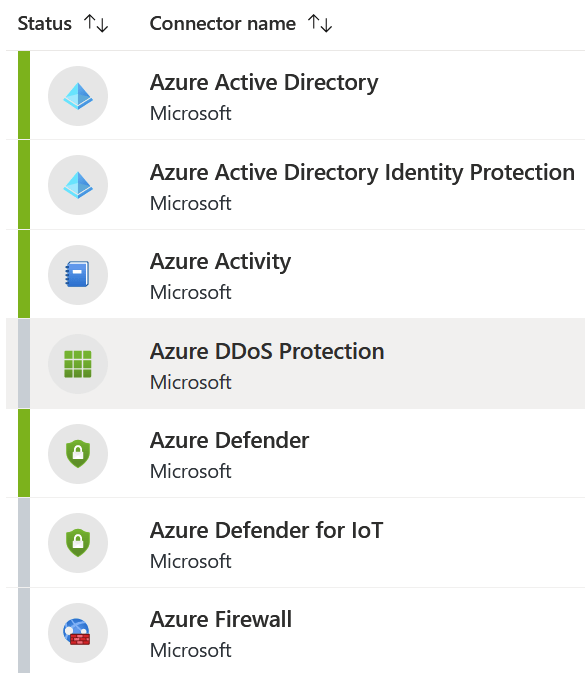
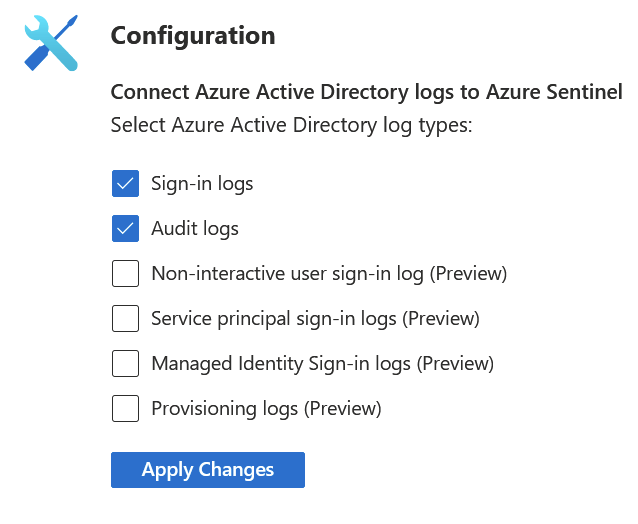
Click through each connector you’re interested in, and you then get to configure them. For Azure AD connectors, I can pull in several logs and have them light up my Azure Sentinel dashboard:
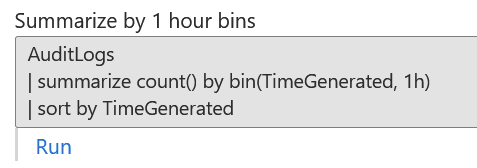
For each connector, you can also try them out by querying the data using KQL – the specific querying language for Log Analytics.
This allows you mix-and-match your data and build custom views for any imaginable data you have. There are also a plethora of built-in workbooks you can utilize without needing to build them from scratch. You can view these under Azure Sentinel > Workbooks.
Here is an example of using the built-in Office 365 activity workbook within Azure Sentinel to get an overview of what is being done within Office 365 by users and admins:

Azure Sentinel obviously has other uses as well – but the point is to get started with the basics. For pricing, you can view the current rates under Settings on the left navi – and it’s based on per gigabyte.
Additional information:
9. Create a “break glass” admin account
Should something go wrong, it’s a best practice to ensure you have at least one (preferably two) highly secure admin accounts that are excluded from MFA. See the best practice for this here.
This way, if you rapidly need to access your services as an admin, you’ll have an account that nobody else uses – and it can bypass MFA. It needs to be a cloud-only account. Thus you’ll create it as a Global Admin in the form of <username>@<tenantname>.onmicrosoft.com.
It’s also a good idea to monitor usage for this – both with Azure Sentinel and Azure Monitor. See the best practice on creating the alert rule here.
10. Sign up for Azure security updates
This last one is easy – filter all Azure updates based on the “security” category and save the RSS feed somewhere where you can see it. You could even create a little automation here – but it’s perhaps more useful to check this feed once a week.
In closing
Thank you for reading all the way down here! This guide was a long time in the making, and I’m happy that I finally had time to finalize and publish this in early 2021. I’ll aim to revisit this topic sometime in the future, and perhaps see if any steps have changed, or should be changed to newer capabilities in Azure.
Have a secure rest of the year!