Building a modern file share using Azure Storage to replace an on-premises file share solution

Many companies have company file shares, such as the K: -drive or similar. Someone reached out to me to ask how they could migrate their existing on-premises file share to Azure. The files are stored on a Windows Server-based server that hosts the files. In this case, the amount of data was about 100 GB – so, while not a massive amount, it was still tens of thousands of files from the past few decades.
The company’s main driver was to move as much of their on-premises infrastructure to the cloud, mainly for cost optimization and financial reasons. Often the price for a gigabyte of data in an old data center might exceed that of what it would cost to host it in the cloud for a year or two.
Current setup
The company has a K: drive located on \\server01\files. It’s mapped to all users and adheres to Active Directory user and group permissions (thus, the regular NTFS ACLs are being utilized).
For users to access a file on the K:\Departments\My Department\Projects\Project A\Offers\ directory, they have to be connected to their on-premises network. With the global coronavirus pandemic, nobody is at the office – and forcing users to open a VPN to access their files is tiresome. The company considered Direct Access, but I wouldn't recommend setting it up as it’s a technology that seems to be no longer evolving.
The intention is to somehow relocate the files from K: to the cloud while maintaining as much of the current user experience for all end users. Let’s consider our options further!
Where to place the files?
In no specific order, I listed all the possible landing places for the files within the Microsoft ecosystem:
- A Windows VM in Azure that shares the files (and utilizes Azure Storage for storage)
- Azure Storage with a Fileshare (essentially not needing a VM)
- A Teams team with the files
- A SharePoint team site with a document library
The last two options are great! But we have tens of thousands of files. Someone must go through them all, decide what belongs where – and perform a time-consuming migration effort. Also, the network mapping experience in SharePoint doesn’t work anymore, so users would have to learn a new way to access their files. This isn’t inherently bad, but ideally, we should avoid this, as most of the files are read-only and for archive purposes.
A Windows VM works well, but we wouldn’t be saving much – as the VM would incur additional costs, even if we’d save perhaps more by freeing up resources from the on-premises data center.
I then decided to start with a plain Azure Storage. Let’s see how that would work.
The plan
Azure Storage allows you to store files in containers, but you can also provision file shares called Azure Files – and these are exposed as SMB 2.1 or SMB 3 file shares. A preview feature to support NTFS permissions within Azure Files was announced in Q1/2020, and it’s now generally available.
The idea is to create an Azure Files share, drop your thousands of files there, and retain NTFS permissions. Users would then map this cloud-based storage using their Active Directory credentials and access their beloved K: -drive like before.
There is only one, but – the user workstation must have line-of-sight to your AD. Therefore, the plan had to make a choice:
- Lift-and-shift, all files to Azure Storage, maintain the current user experience but require a VPN or DirectAccess to authenticate with Active Directory services
or - Lift and shift all files to something more modern.
We decided to try out the first option – to see how well it works. And keep option 2 as a backup.
Lift-and-shift files to Azure Storage: Setting up
It is surprisingly easy, but you must be patient and careful when running the required few scripts. I usually keep track of GUIDs and other notable things in plain old Notepad to understand what is happening.
First, we’ll need to create our future Azure Storage. Doesn’t matter how (Azure CLI, PowerShell, Azure Portal, API, SDK, etc.) you do it – create a normal Azure Storage account:

Within Azure Portal, if you take a look at the Configuration of the Storage account, you’ll see the option to enable Active Directory-based permissions:
You cannot enable it directly, as some preparation must first be done. If you try to click on Enabled, it fails:

Configuring Azure Storage for Active Directory-based authentication
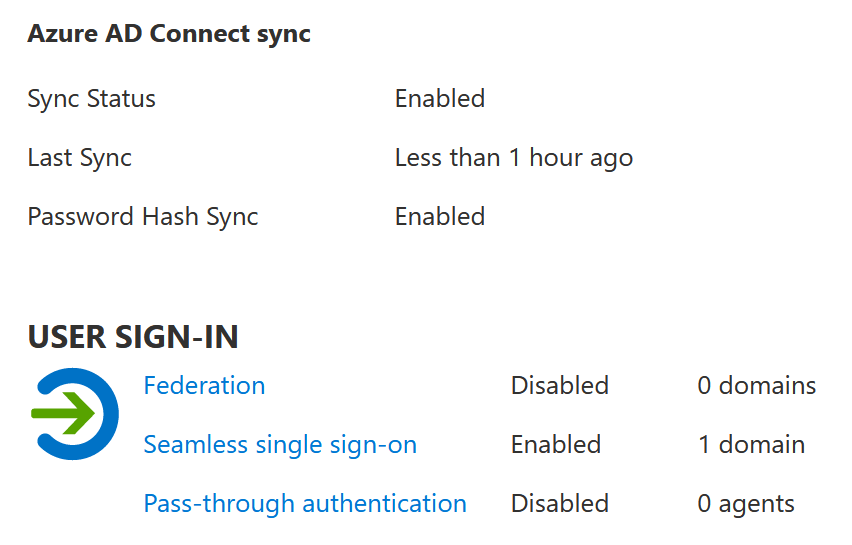
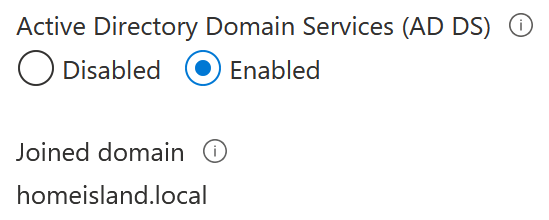
This setup's pre-requisite is a working on-premises Active Directory that synchronizes Azure AD identities. It doesn’t matter if it’s federated identities, as long as you can comfortably utilize those same identities in Azure you use internally. In my lab setup, I have a single Active Directory domain controller that is configured to synchronize to Azure AD using seamless single sign-on:
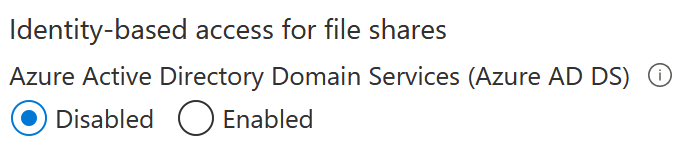
The guidance from Microsoft states you can utilize either a local Active Directory or a cloud-hosted Active Directory Domain Services (Azure AD DS, in essence). I’m using the former – and more classic – setup.
From a domain-joined machine, such as a Windows 10 workstation, run the AzFilesHybrid scripts. The GitHub repo for those files is here.
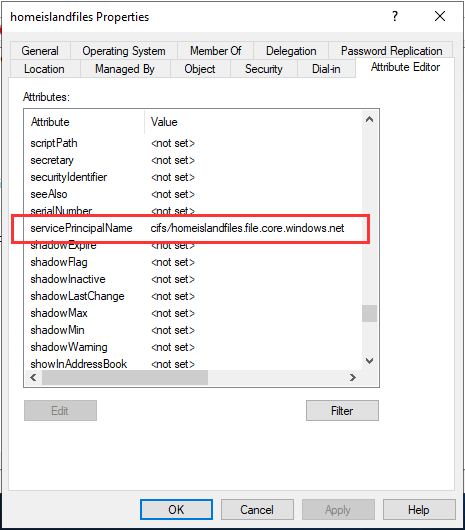
The essence of the script is to run Join-AzStorageAccountForAuth. See the specific script here. It will create an object in our AD that mirrors your storage account. The object looks like this after provisioning:
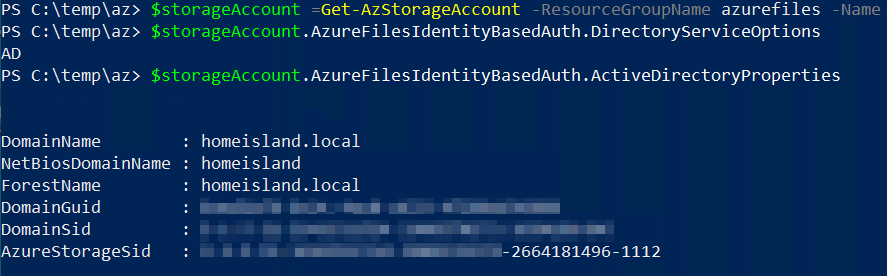
Once you’re done with the provisioning scripts, your Storage account object should expose the following properties populated:
And to confirm, verify in Azure Portal within the Storage account that the Configuration pane now exhibits this same setting:
Finalizing configuration within the Storage account
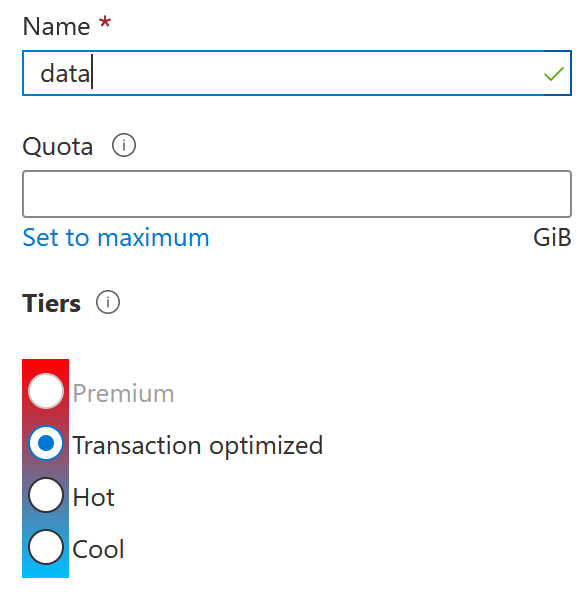
One last thing – provisioning an Azure Files share and granting permissions on that for the users. This one is easy – create a new share within Azure Portal via the Storage account pane:
Go to Access Control (IAM) within the file share Access Control (IAM) and grant access to a test user. My test user is named End User to keep this easy to follow. You have the following built-in RBAC roles to grant:
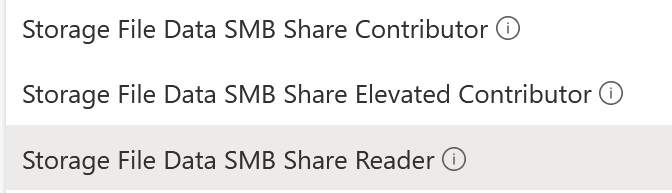
Use the first one – Storage File Data SMB Share Contributor for regular users. This allows read, write, and delete access. The elevated contributor also allows the user to change the NTFS permissions.
Testing the Azure-based file share from a Windows 10 workstation
It’s time to test our setup! I’ll first mount the file share as a regular user to verify I can access the file share from a plain Windows 10 workstation, which is domain-joined.
But first, you’ll need to access the file share using the Storage account’s access key, as you haven’t set proper ACLs for anything on the share yet. To do this, use this handy NET USE syntax:
net use * \\storageaccount.file.core.windows.net\share /user:Azure\storageaccount AccessKey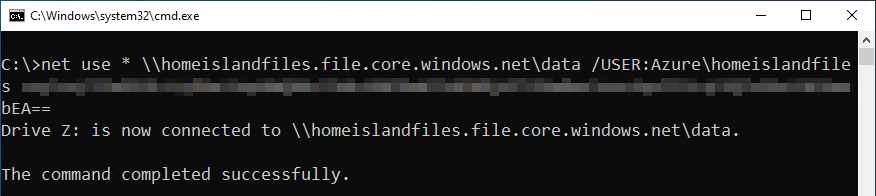
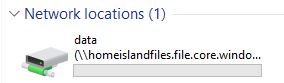
My Z: drive is now available and viewable through Windows File Explorer, for example:
I copied a few files and then granted permissions to my test user, Office User. You can use Windows File Explorer’s Security tab, a command-line tool such as icacls, or something similar.
Removing the mapped drive and remapping it with the Office User credentials shows me it’s working perfectly:

(I only had a few Vivino images handy, so I used those as test files)
Migrating files to the cloud-based file share
So, let’s recap quickly. We’ve set up a new Azure Storage account in the cloud. It’s configured to authenticate users based on their on-premises AD credentials. Users can access the file share directly from a domain-joined Windows 10 box.
When migrating from an existing file share, you must maintain timestamps, file permissions, and other relevant data. To push files from the on-premises file share to this new cloud-based storage, there are several options:
- AzCopy
- Robocopy
- A simple xcopy-operation (you’ll probably lose some valuable metadata)
- Deploying Azure File Sync
I’m a fan of using Robocopy for this exact purpose if the intention is to cut over from the old to the new file-share setup. Azure File Sync is the best choice when you intend to maintain your current setup and leverage the power of Azure Storage.
Further considerations
How did we do? Technically, pretty well! It works. But, the user still needs line-of-sight to the on-premises AD. In that sense, the same user experience is still there, but should the user work from home, for example, we cannot truly utilize the cloud’s elasticity here. Each time the user would have to open a VPN connection before accessing the file share. This is cumbersome, so further consideration is required for this – and multiple options are also available here.