Building a simple and secure DNS updater for Azure DNS with PowerShell

(or: making life better by fixing one small issue at a time)
I love designing and building solutions for my customers. Lately they’ve been more on the Microsoft Azure side, especially with serverless and security. The problems I encounter are interesting, require me to dive deep into certain aspects of the customer’s business domain and they enforce me to become a better professional. I truly think being able to work with cloud-based architectures is the best job on the planet right now.
Then there are the times when I have a small but itching problem at home, that I really hope someone else would have resolved by now. As it turns out, last Friday when I was done with most everything I had on my to-do list, I decided to tackle a problem I’ve had for a few years with my home system. Initially I gave myself an hour to resolve it, because I’m not a fraud, and I certainly know how to do something as trivial as this. I’ve been in the business since 1990, so how hard can it be to crack a small problem with all these modern cloud services?
The problem
At home, I’ve got a dedicated fiber internet connectivity. I don’t have a massive home network anymore, as I’ve collocated most of that in my office where people complain less about the humming noise of rack servers. One of those is an Azure Stack deployment setup, so you get the picture. However, I do have certain services that I keep running 24 hours a day, such as my Synology NAS, a Plex server, and a few virtual machines. And these are the type of services I occasionally like to access remotely.
I have the fabulous Ubiquiti Networks wireless access points, security gateway, and switch at home, and through this infrastructure I’m able to VPN home quite easily using a secure tunnel. The problem, therefore, is that my public-facing IP address occasionally changes. Not often, but occasionally. ISPs in Finland like to hand out dynamic IPs with weird DHCP lease times, so you can never be sure when your IP has changed.
I wanted to have some sort of automation that would update a single DNS A record, should my public IP address change abruptly.
But Jussi, surely there is a solution for this already!
I host most of my domains with a German DNS provider. Not because I’m particularly fond of German people (I know a few and I mostly like them all!) but because the service has been rock solid for over 10 years and does not cost me much. Germans are especially rigorous with money, it seems. They also have a really legacy-looking Perl-is-the-best era UI for updating my DNS records, so that’s been.. fun. But they don’t offer a practical API for me to employ when I need to tweak my DNS values. They have instructions on how to use third-party Windows-only GUI application to automatically update the records, should you wish to go through their 30+ page installation and hacking instructions.
I did try this, and it didn’t work. At the end of that exercise I had a weird .EXE file running on my workstation at home and nothing is updated.
So, I decided I need to build my own tool which is far superior, and more modern. And one that supports Microsoft Azure. After all, I’m not a fraud and I’ve been working in IT for so long this shouldn’t take more than 5 minutes if even that. I was sorely mistaken.
Planning the solution
I used to spend the majority of my days within Visual Studio or Visual Studio Code, but lately I’ve spent the majority of my time in PowerShell, Azure Portal, Azure CLI, and – of course – PowerPoint. As I knew I would have to tweak the solution a bit, I chose to use PowerShell for updating my public IP address to Azure DNS.
I envisioned the following rough architecture for my solution – keep in mind I needed to get this working in about an hour, so the design phase was the time I needed my red wine to breathe in the glass (Friday night, as it was).
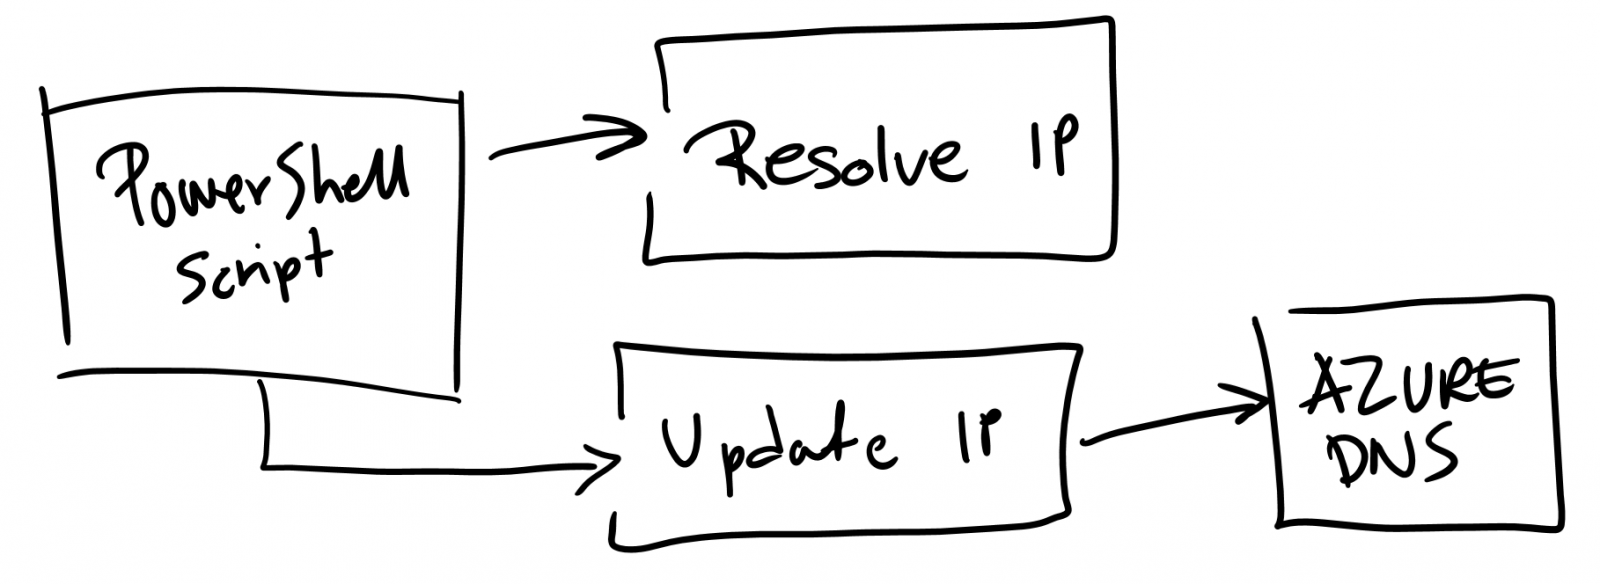
The process for updating my IP is the following:
- Figure out what my current public IP is – using some sort of logic I can trust
- Check what the current IP in the DNS is
- If there’s a change from the current public IP, update the DNS A -record
- If it’s the same, do nothing
Some of the readers might laugh at the simplicity of this approach, and wonder why I don’t employ a redundant database such as Cosmos DB with its subsecond transactional capabilities, or why there isn’t a microservices approach to this. The thing is that I wanted to keep the solution as simple as possible, but also maintain a reasonable level of security for it. Maybe later on I might add fancier capabilities if needed. Surely there’s room for one more blockchain implementation that conforms to GDPR.
Authenticating to Microsoft Azure through PowerShell
To get things started I knew I had to tackle authentication with Azure through an unattended PowerShell session. I’ve used a certificate-based approach many times, but I dislike having a certificate somewhere in my virtual machine that might have too many permissions. And they tend to expire when you least expect it. I wanted to find out if there’s a better, more modern alternative for this.
As it turns out, PowerShell cmdlets for Azure support something called a Service Principal. On paper, this is really simple: instead of using a fixed service account, such as my usual login, I can create an Azure AD managed application definition and grant it limited permissions for performing DNS changes. I won’t have to worry about passwords, login names, or group memberships like with traditional Azure AD or AD accounts.
There’s an even more modern way for doing this, called the Managed Service Identity. I wanted to learn how to use a Service Principal first, so I may update my solution later to use an MSI.
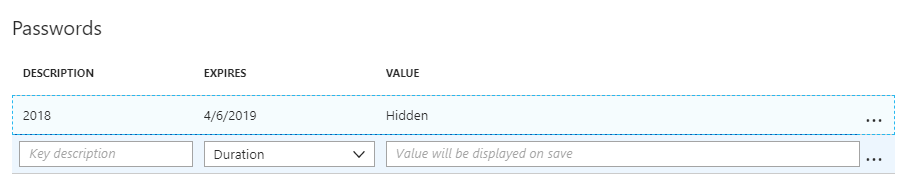
I started by creating an App Registration through the Azure Portal that becomes my Service Principal. This is achieved through the Azure Active Directory > App Registrations. Once created, I generate the client secret key that will be used to authenticate through PowerShell.
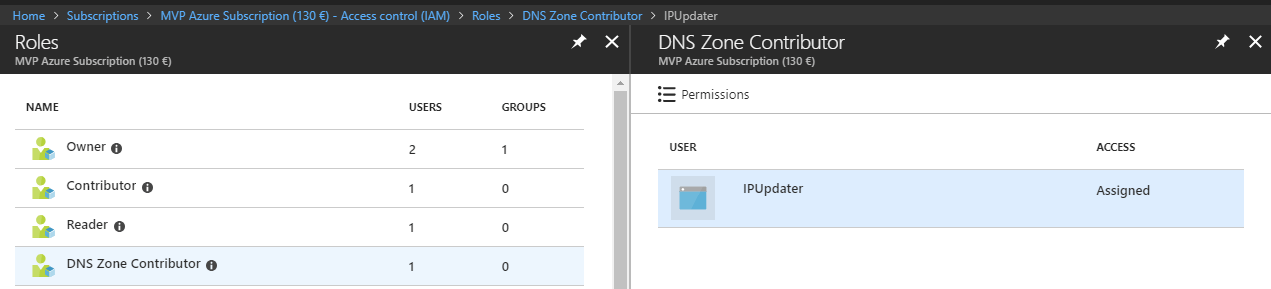
I can now grant this Service Principal permissions for my Azure subscription, under Subscriptions > IAM. I granted only the DNS Zone Contributor role. This way my Service Principal, through PowerShell, can only manipulate DNS Zone settings – and nothing else within my Azure subscription.
As I was anticipating some authentication hurdles with this, I tested creating the Service Principal through PowerShell also. The magic cmdlet is New-AzureRmADServicePrincipal, and it takes the application ID and a password as parameters. This way, I can use Connect-AzureRmAccount to connect with Azure and pass the Service Principal for authentication.
Here’s a quick test to create the Service Principal through PowerShell and authenticating with it:
$tenantid = “ID_HERE” $appid = “APP_ID_HERE”
create Service Principal
$SecureStringPassword = ConvertTo-SecureString -String “PASSWORD” -AsPlainText -Force New-AzureRmADServicePrincipal -ApplicationId $appid -Password $SecureStringPassword
get Service Principal
$svcprincipal = Get-AzureRmADServicePrincipal -SearchString “YOUR_APP_NAME”
authenticate using service principal
$cred = Get-Credential -UserName $svcprincipal.ApplicationId -Message “Enter Password” Connect-AzureRmAccount -ServicePrincipal -ApplicationId $svcprincipal.ApplicationId -Credential -TenantId $tenantid
As this worked, I knew it was now simple to build the actual logic for updating DNS values.
Updating Azure DNS zones with PowerShell
First, I needed to resolve my current IP. I wasn’t sure if my Ubiquiti devices would have a meaningful way for this, so I went to look for a free and easy to use API to resolve this. When I’m configuring remote access for customers I tend to use http://www.whatismyip.com/ manually, as it just works. I thought for a second to parse the output from this page, as I recall doing that once before, but that seemed too hacky.
I found another service from Gratis DNS, that simply outputs my IP directly without any hassle – the service is accessible here.
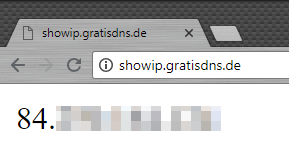
It’s easy to call this IP and parse the content from PowerShell:
$dynamicIP = Invoke-WebRequest ‘http://showip.gratisdns.de’ | select Content
To prepare my DNS zone in Azure, I delegated a subdomain from my usual domain to Azure DNS. I also set the TTL for my domain to 300 seconds (5 minutes), to make testing changes a bit quicker.
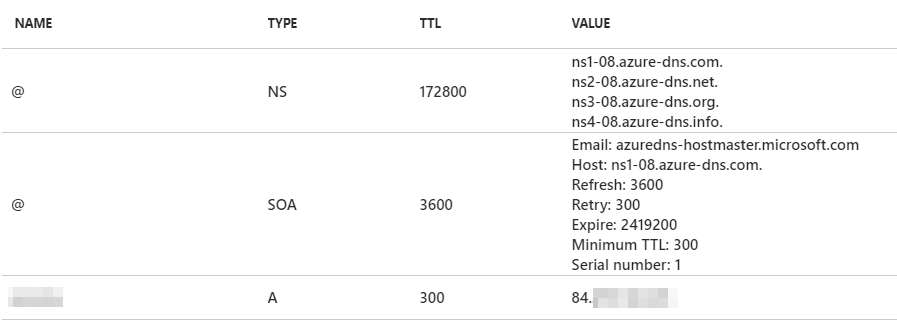
To update Azure DNS settings, I first need to query what is already stored in the zone. This is achievable with Get-AzureRmDnsRecordSet, which provides me with a list of one or more IP addresses. It’s then easy to compare the IP address I resolved from the external service, to the one I have stored in DNS. If there’s a change, I’ll use Set-AzureRmDnsRecordSet to update it.
Putting it all together in PowerShell
My logic now has three parts – authenticating with a Service Principal to Azure, querying for values currently stored in the DNS zone, and updating the value if necessary.
A working script is below. Just change the values to reflect your own Azure environment.
$dnsZone = 'domain.com'
$hostname = 'remoteaccess'
Write-Host "Setting authentication..`t" -ForegroundColor White -NoNewline
$appID = 'MY_APP_ID'
$appSecret = 'APP_SECRET_KEY'
$subscriptionID = 'SUBSCRIPTION_ID'
$tenantID = 'TENANT_ID'
$SecurePassword = $appSecret | ConvertTo-SecureString -AsPlainText -Force
$cred = new-object -typename System.Management.Automation.PSCredential `
-argumentlist $appID, $SecurePassword
Write-Host "OK" -ForegroundColor Green
Write-Host "Authenticating to Azure..`t" -ForegroundColor White -NoNewline
Login-AzureRmAccount -ServicePrincipal -Credential $cred -TenantId $tenantID -Subscription $subscriptionID > $null
Write-Host "OK" -ForegroundColor Green
Write-Host "Resolving dynamic IP..`t`t" -ForegroundColor White -NoNewline
$dynamicIP = Invoke-WebRequest 'http://showip.gratisdns.de' | select Content
Write-Host $dynamicIP.Content -ForegroundColor Green
Write-Host "Resolving current IP in DNS..`t" -ForegroundColor White -NoNewline
$rs = Get-AzureRmDnsRecordSet -Name $hostname -ZoneName $dnsZone -ResourceGroupName DNS -RecordType A
Write-Host $rs.Records.IPv4Address -ForegroundColor Green
if (-Not ($dynamicIP.Content -eq $rs.Records))
{
Write-Host "Updating IP to DNS.. " -ForegroundColor White -NoNewline
$rs.Records[0].Ipv4Address = $dynamicIP.Content
Set-AzureRmDnsRecordSet -RecordSet $rs
Write-Host "OK" -ForegroundColor Green
}
else
{
Write-Host "IP hasn't changed -- no need to update." -ForegroundColor White
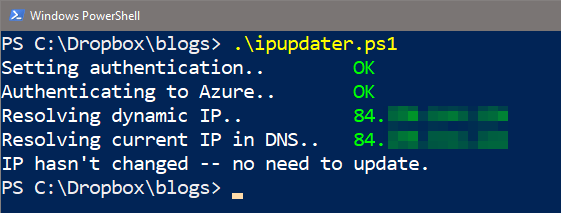
}I now execute this PowerShell once a day in one of my virtual machines. The cleaner output also helps if things fail at any time:
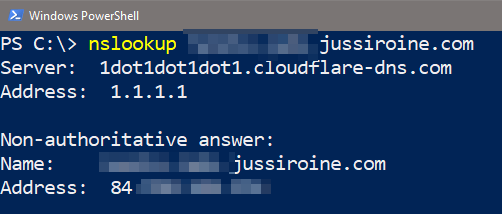
And verifying that my IP is in place is, of course, easy with NSLookup:
In closing
It was fun building this small utility, that I now use to keep my public DNS updated with my dynamic IP changes. The IP hasn’t changed all that much, but whenever it does I can now be certain I can still access my home network remotely.
For a future version I’ve already had some additional ideas. Ideally I should run the PowerShell outside my network – preferably in Azure Functions, as I could simply call it remotely with an oneliner. I should also then be capable of employing Application Insights with alerts, should the IP change, or the script fails.
One more small issue fixed – onwards to the other ones!
Jussi Roine
Microsoft MVP and consultancy founder with 30+ years of experience, passionate about Microsoft security, AI governance, and sharing what I learn along the way.